

Revised 06/26/2026
Prerequisites:
- GOapply Administrator Security Role to edit records within GOapply GOapply-specific tables
- Member of the GOmanager Group to launch Form Editor (build Phase) and impersonate a GOapply User
GOapply is akoyaGO’s external application and review portal. akoyaGO Users with a GOapply Administrator Security Role can create Opportunities and Phases, manage GOapply Users, configure GOapply User Interface settings, and more. GOapply and akoyaGO share information utilizing a process called mapping.
This guide provides resources to manage the GOapply setup and process from start to finish. For additional GOapply Admin information, please see the GOapply Basic Admin Video Series.
- Getting Started
- GOapply Settings
- Email Templates
- System Views
- Building Opportunities
- GOapply Status Tracking Records
- Status Tracking Attachments
- GOapply Users
- GOapply Automations - Buttons & Flows
- GOapply Logs
Getting Started
Before creating an Opportunity, it is helpful to review the terms GOapply uses.
Glossary of Terms
- akoyaGO refers to your main database (also known as CRM) that contains the Grant Management and GOapply areas.
- GOapply UI: the user interface, or applicant/reviewer portal itself. The UI is what your applicants and reviewers (the end users) interact with.
- Mapping: This refers to the process of GOapply and akoyaGO “talking” to each other. The most common example of mapping is creating a Request upon phase submission, with all its fields and tabs filled in based on applicant input.
- Lookup Field: A field in akoyaGO that references or links to another record, such as the Primary Contact field on Request. Lookup fields are marked by a magnifying glass icon.
- Form Definition: A form definition is a string of code that represents forms that you create in Form Editor (more information below). Form Definition fields will autofill/update when you create or modify a form.
- Dynamic Panel: A feature used to capture and map information to records related to a Request, such as the Applicant - Constituent or Primary Contact - Contact. Dynamic Panels can also display data from akoyaGO CRM and pre-fill information.
GOapply Administrator Security Role
GOapply Administrator is a standard akoyaGO Security Role. For more information on the GOapply Administrator Security Role and the permissions it grants, please see akoyaGO Standard User Security Roles.
For steps on managing/assigning Security Roles, please see Onboarding and Offboarding Users (Admin Guide) - Security Roles.
GOapply Settings
GOapply Settings houses fundamental controls for how your GOapply site looks and functions.
1. In akoyaGO, you will see an area called GOapply. This is where you will create opportunities and phases, view Status Tracking records, view GOapply users, and determine GOapply Settings.
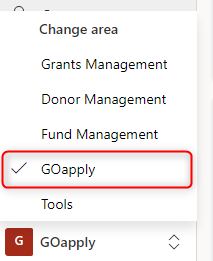
2. From the left navigation bar, choose Settings.
3. GOapply Settings is split into four tabs - General, Theme, Labels, and Organization Profile.
General Tab
GOapply URL: This is your unique GOapply URL. This is the link you can share with applicants, reviewers, and/or your team. Once data has been added to this field, it will be locked, so be sure it is correct.
Site/Subdomain: The specific subdomain associated with the settings record. If your organization uses multiple GOapply sites/settings, this field will distinguish between them.
Foundation Contact: required lookup field to users that determines who the automatic GOapply emails come “from”. This user will also receive GOapply User approval requests when the Applicant Approver is a Foundation Contact.
*IMPORTANT: The Foundation Contact MUST allow Microsoft to send emails on their behalf, or automated emails will not be able to send from akoyaGO. For more information on allowing this permission, reference this Knowledge Article: Allow Microsoft to Send Emails on my BehalfDocument and Attachment Setting
- Consolidated PDF and attachments as originally named by the applicant: Consolidated PDF means that any uploads from the applicant are stitched to the end of the submitted PDF. With this option, what you will see in Request > Documents is the submitted PDF with uploaded files stitched in, along with each individual upload named as the applicant named it. For example, if an applicant uploads a file named “Organization Mission Statement,” it will appear as “Organization Mission Statement” in Request > Documents.
- Consolidated PDF and attachments named by question name: With this option, what you will see in Request > Documents is the submitted PDF with uploads stitched in addition to each upload named as the question name in the phase. For example, if an applicant uploads a file called “Organization Mission Statement” to a question called “Please upload your organization’s mission statement,” then the file will be named Please upload your organization’s mission statement in Request > Documents.
- Application and attachments not consolidated: In Request > Documents, file uploads will NOT be stitched to the submitted PDF, but will be listed separately from applicant uploads.
- Consolidated PDF only: Only the submitted PDF with the file uploads stitched to it will move to Request > Documents.
- Attachments only: Only the individual file uploads will move to Request > Documents.
Custom Flow: Choose this option if you have a custom document move flow.
- Consolidated PDF and attachments as originally named by the applicant: Consolidated PDF means that any uploads from the applicant are stitched to the end of the submitted PDF. With this option, what you will see in Request > Documents is the submitted PDF with uploaded files stitched in, along with each individual upload named as the applicant named it. For example, if an applicant uploads a file named “Organization Mission Statement,” it will appear as “Organization Mission Statement” in Request > Documents.
- Automatch Enabled: When set to "Yes," this enables the Scholarship Automatch feature for this site. This automatically matches applicants with the scholarships they are eligible for based on predefined criteria. For more information, please see GOapply - Scholarship Automatching.
- Enable Email Verification: When Yes, new users will receive an email to verify their email address after completing registration. When No, users will not be asked to verify their email address. To resend the email verification request, go to the appropriate GOapply User record and use the Diagnostics toolbar action. Users who have registered but have not verified their email will be put in a Status Reason of Pending Email Verification. A system view exists that filters on this called GOapply Users Pending Email Verification.
- Max Scholarship Opt Ins: Optional field to set a whole number that represents the maximum number of scholarships that an applicant is allowed to opt in to. For example, if an applicant is eligible for 15 scholarships, but this field is set to 10, they can only opt into 10 of the 15 scholarships. If you do not want to set a limit, leave this field blank, and applicants will be able to opt in to as many scholarships as they want/are eligible for. Note: when Automatic Opt-In = Yes, the Max. Scholarship Opt Ins field will be disabled. For more information, please see GOapply - Scholarship Automatching
- Allowable Registration Type: Individual, Organization, or Both. This limits the types of users who can register in GOapply and determines which options will be available upon registration.
- Registration Status:
- Open: applicants can register for an account
- Invitation Only: applicants cannot register accounts; access is granted only through invitations. The " Register an Account " button will not be displayed in the GOapply UI. For more information, please see the GOapply Invitation-Only Opportunities knowledge article.
- Registration Charity Search: determines which integrated database is used when a registrant searches for Organizations upon registration
- United States: Results will be returned from the US IRS Tax Exempt Search Tool
- Canada: Results will be returned from the Canada List of Charities - basic search tool
- Both: Results will be returned from both searches
- None: all registering organizations must input their information manually to create an account, or choose an existing constituent from your akoyaGO CRM
- Blank: If the Registration Charity Search field is left blank, this will default to Both
*Please note that regardless of the Registration Charity Search option that is chosen, constituents from your akoyaGO CRM will be displayed for the registering user to choose from. The registering user can also skip the results returned by their search and manually enter their organization's information.
- Applicant Approver: This field determines whether users registering with the organization will require approval and, if so, to whom the approval email will be sent. Please note that this field only affects organization users. Individual users applying on their own behalf will be auto-approved regardless of the setting chosen.
Applicant Approver options are Foundation Staff, GOapply Contact, or Automatic Approval.- Foundation Staff: This option requires a Foundation staff member to approve all organization registrants. The email will be sent to the person specified in the Foundation Contact field (as designated in GOapply Settings). Please ensure this person has send-as permissions. The approval process allows you to choose to approve the applicant as a submitter (can start, fill in, and submit phases), as a contributor (can start and fill in phases but cannot submit), or to deny registration. If this Applicant Approver method is chosen, GOapply Users will be created with a Status Reason of Pending. The GOapply User's Status Reason will be updated to Approved or Denied automatically when the Foundation Contact approves/denies this user by clicking the link in the automated email sent when an Organization user registers. Alternatively, the links to approve or deny a user can be accessed from the Activation URLs tab of a GOapply User record.
- GOapply Contact: This option requires someone designated at the registering organization to approve all organization registrants. The email will be sent to the person in the GOapply Contact field on the Constituent record. If no GOapply Contact is listed for the constituent, the email will be sent to the Foundation Contact. The approval process allows an organization member to approve the applicant as a submitter (can start, fill in, and submit phases), a contributor (can start and fill in phases but cannot submit), or to deny registration. If this Applicant Approver method is chosen, GOapply Users will be created with a Status Reason of Pending. The GOapply User's Status Reason will be updated to Approved or Denied automatically when the constituent's GOapply Contact (or Foundation Contact if no GOapply Contact is listed) approves/denies this user by clicking the link in the automated email sent when an Organization user registers. Alternatively, the links to approve or deny a user can be accessed by an akoyaGO user from the Activation URLs tab of a GOapply User record.
- Automatic Approval: This option does not require registrants to go through any approval process. If this option is chosen, all organization users will be automatically approved and assigned the Submitter permissions. GOapply Users will be created with a Status Reason of Approved. In this case, registrants will not receive a registration confirmation email.
*Please note that if you are using an approval method other than Automatic Approval, the GOappy user will receive an email once a decision has been made. This email is driven by the GOapply - Approval/Denial Email Response to Registrant Email Template (found in the Tools area of akoyaGO). If you are utilizing an Applicant Approver method other than Automatic Approval, make sure to review this Email Template.
- Foundation Staff: This option requires a Foundation staff member to approve all organization registrants. The email will be sent to the person specified in the Foundation Contact field (as designated in GOapply Settings). Please ensure this person has send-as permissions. The approval process allows you to choose to approve the applicant as a submitter (can start, fill in, and submit phases), as a contributor (can start and fill in phases but cannot submit), or to deny registration. If this Applicant Approver method is chosen, GOapply Users will be created with a Status Reason of Pending. The GOapply User's Status Reason will be updated to Approved or Denied automatically when the Foundation Contact approves/denies this user by clicking the link in the automated email sent when an Organization user registers. Alternatively, the links to approve or deny a user can be accessed from the Activation URLs tab of a GOapply User record.
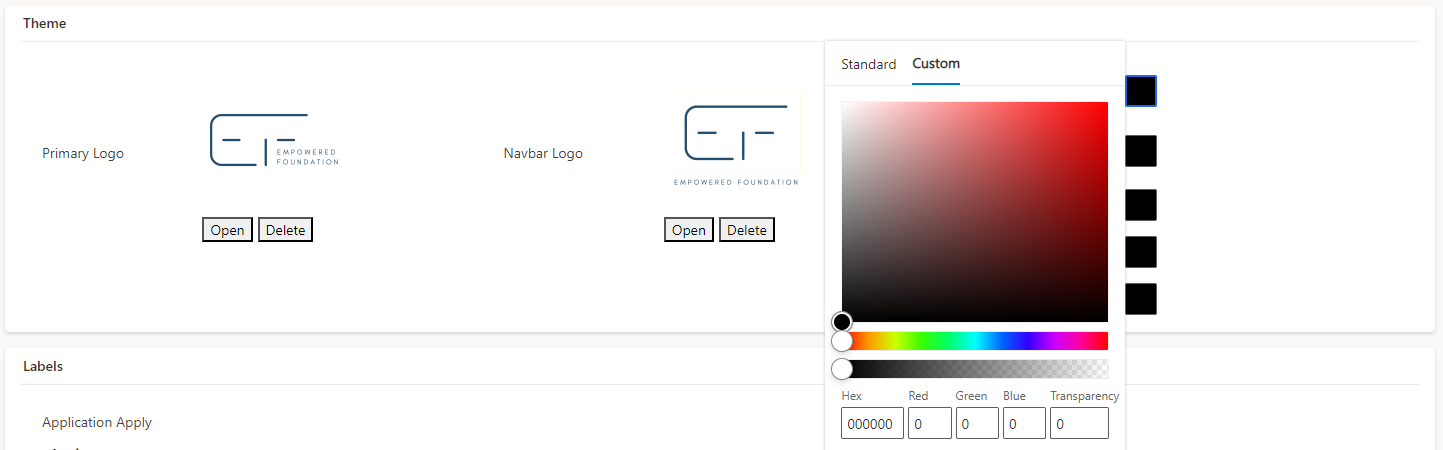
Theme Tab
- Primary Logo: This is what appears on the sign-in page.
- Navbar Logo: The logo that appears at the top-left of the GOapply UI.
- Color Selector: Click on the box to choose a color and toggle to the Custom tab to enter a HEX code or RGB code. Below is a breakdown of each theme field and its UI association.
- Primary Theme Color: Color of primary buttons. These changes appear on the login screen, dashboards, opportunities, and the logout screen. Button colors set by the Primary Theme Color include:
Sign In (Sign In Page)
Register (Registration Page)
Search (Organization Registration)
Apply (Opportunities Tab)
Change Password (User Settings)
Submit All (Matched Scholarships)
Secondary Theme Color: Color of certain buttons, often more optional selections, such as the “Save Draft” button (In Progress tab) and Print Blank (Opportunities tab). Please note that the colors of the Submit button and Previous/Next buttons are not customizable at this time.
Background Color: The color of the screen background.
Text Color: Color of the text throughout the site. This field defaults to black or white, depending on the background color's intensity.
Link Color: Color of links (can be link text or link buttons).
Navbar Color: The color of the navigation bar that runs across the top of the page and contains menu options such as Opportunities, In Progress, and Submitted.
Navbar Text Color: The color of the text in the navigation bar. This field will default to black or white depending on the intensity of the navigation bar color.
Footer Color: Color of the footer bar that runs along the bottom of the screen. This field will default to the Background color unless otherwise specified.
Footer Text Color: Color of the text in the footer. This field defaults to white or black based on the footer color's intensity.
LabelsTab
- Application Apply: What you enter in this field is what will appear on the button that applicants use to start a new phase. This field changes the button on all published opportunities. If left blank, it will default to “Apply”.
- Login Instructions: This is a rich text editor field. Format your login instructions as you like. This will appear on the left side of the sign-in page. Please note that images are not supported in rich text fields.
- Registration Page Text: Optional rich text editor field that will appear on the initial registration page.
- Individual Registration Page Text: Optional rich text editor field that will appear when the user clicks Individual in the screen above.
- Organization Registration Page Text: Optional rich text editor field that will appear when the user clicks Organization in the screen above.
- Individual Account Creation Confirmation Text: This is a rich text editor field. This field lets you display a message to new individual users when they create their account. This message will be displayed on the GOapply account creation confirmation page.
- Organization Account Creation Confirmation Text: This is a rich text editor field. This field lets you display a message to new organizational users when they create their account. This message will be displayed on the GOapply account creation confirmation page.
- Invite User Email Input Help Text: Text that will display on the GOapply Invite User page as helper text under the email input box in the GOapply UI.
- No Scholarship Match Text: Optional rich text field that will display to scholarship applicants in the case that they do not match with any scholarships. If left blank, a default message will show. We encourage customizing the language in this field to clearly communicate with your applicants. This is a good opportunity to explain why they have no matching scholarships and any next steps your organization has in place.
**A Note on Manual Organization Registrants**
It is best practice for users registering as part of an organization to use the Tax ID search to select their organization. However, users can register manually by entering their organization's information in a form. Upon registration, this form will try to match the user's organization with existing akoyaGO CRM Constituents. If the Name, Tax ID, Department, and City match exactly, the GOapply User will be added to the existing constituent. If the Name, Tax ID, Department, or City differs in any way, a new constituent record will be created, and the user will be assigned to it. If there are duplicate constituents in the CRM (same tax ID), the GOapply user will be assigned to the record with the lower constituent number.
Organization Profile Tab
Organization GOapply users will see an organization profile in the GOapply UI, where they can view and update (if allowed) organization (aka Constituent) information. A default organization profile may have been uploaded to your system, but you can select the information that you want to collect (or pre-fill) from applicants.
Org Profile Form Definition: This field will auto-populate once the org profile form is created.
Display GOapply Users: For organization users, enabling this option will display a list of all users (both active and inactive) for the related organization. Please note if you enable this feature, active users can be deactivated by the GOapply user in the GOapply UI.
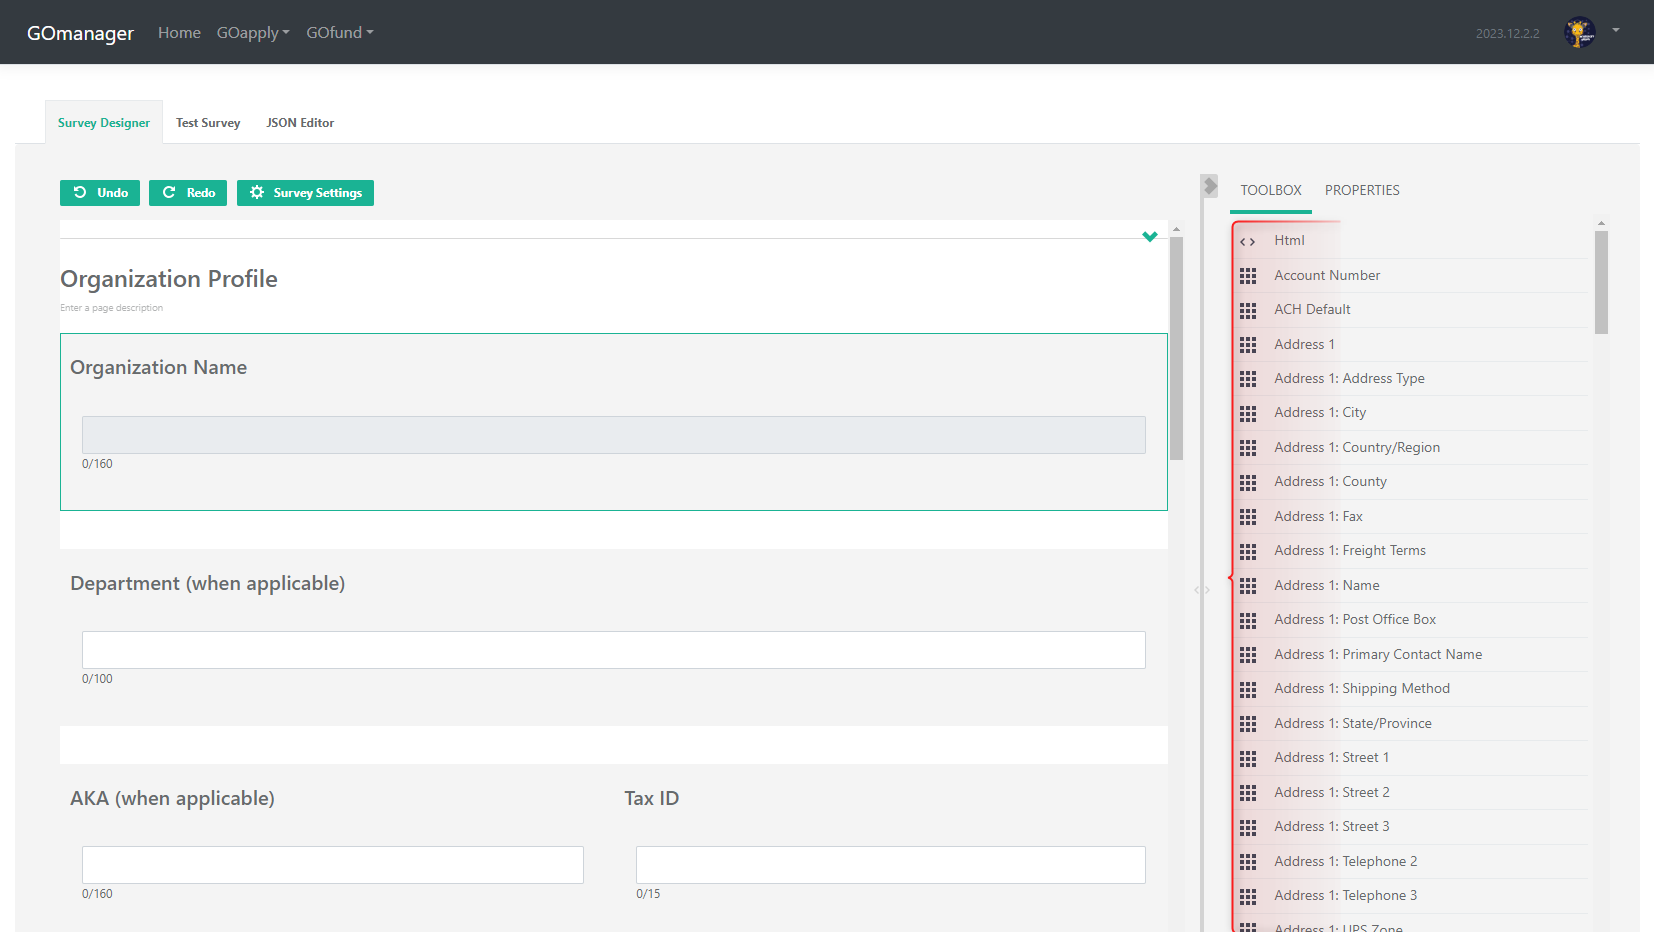
Launch Form Editor: This is where you can build and edit the organization profile that organization users will see. Click Launch Form Editor, and the form editor will open. In the toolbox (right-hand side), you will see all fields in the Constituent record (including any custom fields you may have). Drag and drop the fields you want to include in the organization profile. The fields are already mapped, and if the information already exists in the applicant’s parent organization, the fields will be pre-filled when they navigate to the organization profile. More information on this can be found in the following section.
Enable Organization Profile Change Requests: This field will default to NO. If you would like to require review and approval by an akoyaGO user before changes made to the Organization Profile by a GOapply User are applied to the Constituent record in akoyaGO, you can switch this field to YES to opt in to this feature. More information on the Change Requests can be found here: Change Requests Knowledge Article.
Profile Header Text: will display at the top of the Organization Profile.
*If you are enabling Organization Profile Change Requests, an example of text you might want to place here would be: "Please be aware that any profile changes are subject to the Foundation's approval. We will review your data change requests. After a GOapply user has requested to update data for your organization, this form will lock, and you cannot make any other adjustments until the Foundation has reviewed your changes."- Profile Submissions Confirmation Message: text that will appear to the GOapply user after making changes to the Organization Profile. For example, "Thank you for updating your Organization Profile! The Foundation will review your changes."
- Profile Change Request Already Active Message: if you are enabling Organization Profile Change Requests, the Organization Profile will lock after a GOapply User makes an update (until an akoyaGO user has reviewed and processed the change request). You can add a message here to provide additional information to the GOapply User. (For example, your organization has requested to update your Organization Profile. You cannot make any further updates until the Foundation has reviewed your data change requests.)
Please note that if you choose Enable Organization Profile Change Requests, the GOapply User will receive an email when a change request is submitted and when it is complete. If you are utilizing Organization Profile Change Requests, make sure to review these Email Templates. These emails are driven by the following Email Templates:
GOapply - Organization Profile Change Requested Notification
GOapply - Organization Profile Change Request Completed Notification
*Change Requests and Organization Profile Changes*
When a user updates their first or last name, a new Contact record will be created in akoyaGO CRM, regardless of whether Change Requests are enabled. If they are, a new contact will be created only after the Change Request has been approved. If Change Requests are disabled, a new contact will be created as soon as the changes are submitted.
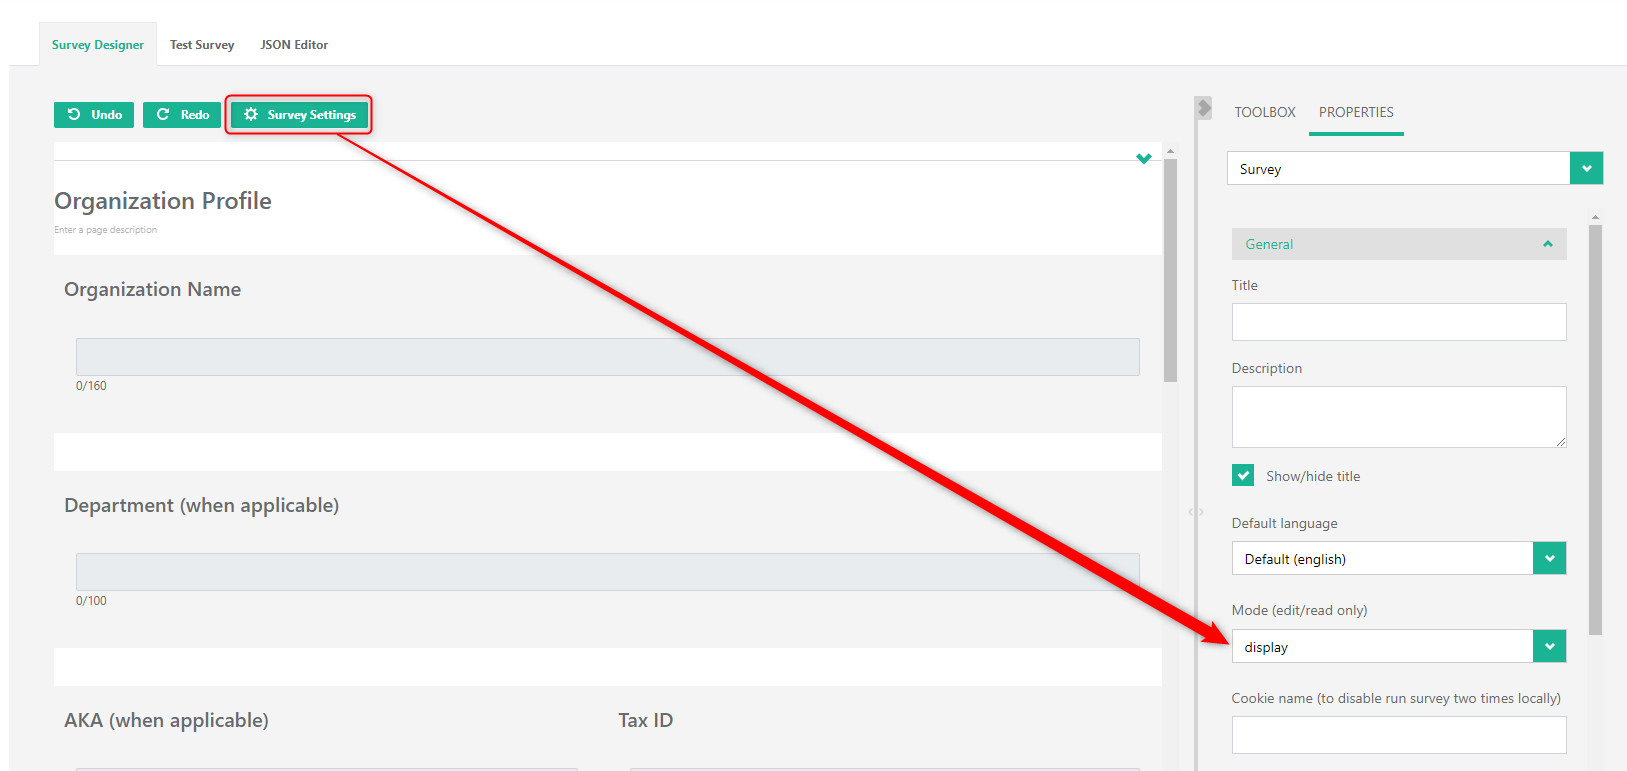
Form Editor - Organization Profile
Click the Launch Form Editor button to edit the Organization Profile. For information on how to use Form Editor, see the GOmanager/Form Editor Knowledge Article.
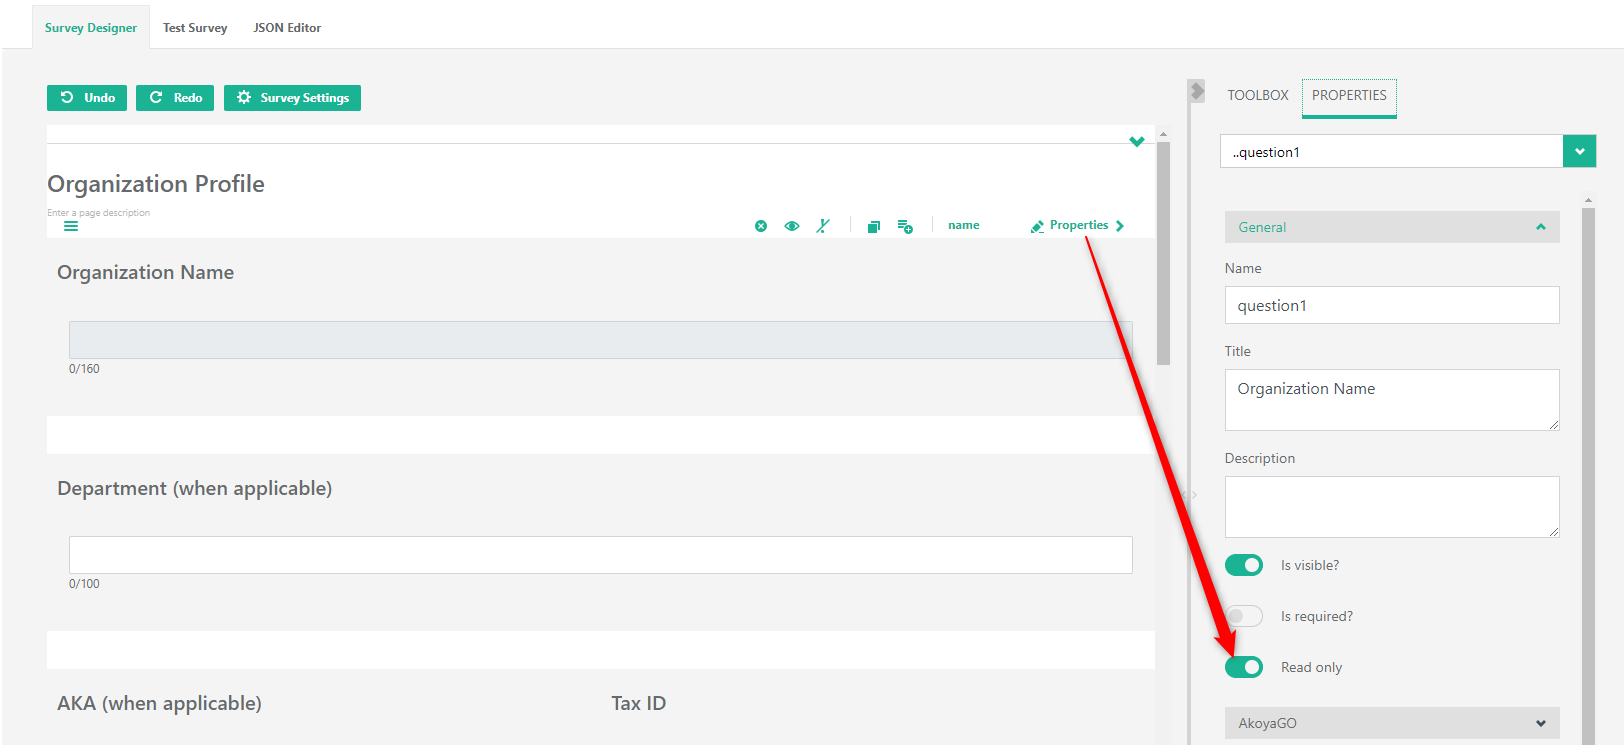
Unless set to Read Only, users can edit the field in their organization profile, and those changes will be reflected in the organization's Constituent record in CRM upon saving. To prevent users from editing the field, set the field's properties to Read Only.
*It is akoyaGO's best practice to set the Organization Name and the Tax ID to read only, as these values do not typically change, and if there is a change, you most likely want someone from the organization to reach out to the foundation. If you allow GOapply users to edit this information in the Organization Profile, it will update the data on their constituent record in akoyaGO (if you are not utilizing Change Requests).
If you never want users to be able to edit their organization profile, set the Mode in the form settings to Display. This effectively makes the organization profile read-only.
Pre-Work Checklist
Before you start creating opportunities, it’s important to plan. Think about the data in your applicants’ submissions. Which data points would you like to capture in akoyaGO? GOapply has robust mapping options. If it exists in akoyaGO, you can capture it with GOapply. Read over our Pre-Work checklist before starting to build your opportunity.
Email Templates
There are several Email Templates that can be utilized to send automated emails related to GOapply. Some of these Email Templates will be utilized based on how you have configured your GOapply Settings. Email Templates can be customized as needed. For more information on editing Email Templates, reference the How to Edit an Email Template in the akoyaGO Knowledge Article.
Email Templates can be accessed from the Tools area of akoyaGO. Please note you must have an akoyaGO Administrator Security Role to edit out-of-the-box Email Templates.
To view GOapply specific Email Templates, navigate to the GOapply Email Templates System View:
Several of these Email Templates will have a Description providing additional information about when this email will be sent
System Views
Some of the information displayed externally in the GOapply UI is driven by System Views. This means if you would like to adjust how this information is displayed to GOapply Users, a System Customizer can do so by editing these System Views. Additional information on editing System Views can be found here: Editing System Views
In Progress Tab - GOapply UI
The In Progress tab in the GOapply UI shows the GOapply User all Status Tracking records that are in a status of Not Started or In Progress:
The columns and data shown in this tab are driven by the In Progress System View within the Status Trackings table:
Submitted Tab - GOapply UI
The Submitted tab in the GOapply UI shows the GOapply User all Status Tracking records that are in a status of Submitted or Waiting for Third Party Response:
The columns and data shown in this tab are driven by the Submitted System View within the Status Trackings table:
Opportunities Tab - GOapply UI
The Opportunities tab in the GOapply UI shows the GOapply User all open Opportunities for their user. By default, this will show:
- Published GOapply Opportunities with a current or past Publish Date
- Invitation Only = No
- Status = Active
- Phase 1 Due Date is in the future or is blank
- Opportunity Type matches the GOapply User Type (Individual users see Opportunities for Individuals, Organization users see Opportunities for Organizations)
The columns shown in this tab are driven by the Funding Opportunities System View within the GOapply Opportunities table:
Building Opportunities
Now that you have the foundation of your GOapply site set up, you can start building your Opportunities.
Opportunities are composed of phases. Every opportunity will have at least one phase (like the application phase), but an applicant may complete several phases within an Opportunity. For example, there might be an opportunity called the 2026 Program Grant, with multiple phases, such as Application, Grant Agreement, and Report.
To create a new opportunity, begin in the GOapply area and click on the GOapply Opportunities table on the left navigation bar.
Create Opportunities
Click +New in the top toolbar to set up a new opportunity. Please note that you can also duplicate an existing opportunity. For more information, please see GOapply Automations - Buttons & Flows section.
You’ll be taken to the New GOapply Opportunity form. If you are creating an invitation-only opportunity, please see Invitation-Only Opportunities.
Fill in the form. Hover your mouse over the field name for tooltips with more information. Below is a deep dive into each field on the page. Please note that Invitation Only and Enable PDF Preview default to No.
Opportunity Name: Required field. Fill in the name of the opportunity. This is an applicant-facing field.
Opportunity Type: Required field. Individual (most common for scholarships), Organization (only org users can apply), or Both.
Request Type: Required field. Maps back to Request records for each submission.
Max Submissions: Required field. Use a whole number. No limit to the number of submissions.
GOapply Site Settings: This field is meaningful for organizations that utilize more than one GOapply Site. If you only have one GOapply Settings record, select it here. If your organization utilizes more than one GOapply Site, choose here the site in which applicants will apply for this opportunity.
Invitation Only: Yes/No field. Choose yes if this Opportunity is invitation-only to remove it from the public Opportunities tab in the GOapply UI. If this field is marked No or is blank, all eligible users will be able to apply for this Opportunity. Please note that if you set this field to Yes, users can still access it through the direct URL using the Title Slug (see above)
Title Slug: create a URL that is more index-friendly. Whatever you input in the Title Slug field will appear in the opportunity URL after “application/”. Title slugs cannot include spaces or be duplicated. To create a Title Slug, you should enter a word or phrase (without spaces) into the title slug field. Then, you can provide a direct URL to your applicants using the Title Slug, and the link to your application will be: http://www.goapply2.akoyago.com/YOUR DOMAIN/application/TITLE SLUG.
Hero Image: Attach an image to your opportunity. This image will appear at the top of the “home” page of the opportunity. Recommended file types are PNG or JPG, and the maximum image size is 10KB.
Hero Image Max Height: Whole number 1-100. This number represents the percentage of the screen the image will take up. For example, “20” in the field would scale the image to fill only the top 20% of the screen. “100” in the field would scale the image to fill the whole screen.
Summary: An opportunity summary is typically 1-2 sentences about the opportunity. For example, you might use this to provide more information about deadlines or programs. For example, “Grant Application to request support for projects in the area of education.” This field is a rich text editor. Please note that images are not supported in rich text fields. Best practice is to type the summary directly in this field. When copying and pasting from other apps, the original formatting cannot be guaranteed. The character count for this field is 2,000; however, this includes HTML characters, such as line breaks.
Description: An opportunity description can be a little longer and include more details. It can be used to provide more information on funding priorities, limitations, restrictions, etc. An example could be, “Funding priorities for this opportunity include women, children, and literacy. Requests must be $50,000 or below. Organizations may receive up to two grants per year.” This field is a rich text editor. Please note that images are not supported in rich text fields. Best practice is to type the summary directly in this field. When copying and pasting from other apps, the original formatting cannot be guaranteed. The character count on this field is 2,000 characters; however, this includes HTML characters such as line breaks
Guideline URL: Link to any rules/tips/guidelines for this opportunity, if you have them. This will appear in a box labeled "Guidelines" on the opportunity "home" page.
Phase Contact: Select the designated staff member to contact with questions about this opportunity. Users will see this on the opportunity “home page” as a link to the contact’s email. Please note this is a lookup field to Contacts; check the email address and Contact record you are listing here.
Publish: When set to YES, this opens the Opportunity to all GOapply users matching the Opportunity Type; that is, Organization Opportunities are published to Organization Users only, and Individual Opportunities are published to Individual Users. This setting makes the Opportunity visible under the "Opportunities" tab in the GOapply UI only if it is not set to Invite Only. This field works in conjunction with the Publish Date field. When an Opportunity is Published, a Publish Date will be required.
For information on best practices on unpublishing an Opportunity, please see the related Knowledge Article GOapply Best Practices - Closing Grant and/or Scholarship CyclesPublish Date/Publish: Enter a date for the opportunity to be published in the GOapply UI. This is helpful for organizations that wish to set a future publication date. The Publish Date and Publish fields work together. If Publish Date contains data, Publish must be Yes in order for this Opportunity to appear in the GOapply UI. If an Opportunity is published, it will require a Publish Date.
To publish the opportunity immediately, enter the current date and time in the Publish Date field.Enable Print Blank: If Yes, applicants will be able to download a blank PDF version of the phase. Please note that ALL fields will be visible in the blank PDF, including hidden fields and all fields in branching logic questions. This feature is not intended for paper applications.
Automatch Enabled: For opportunities with a Scholarship Request Type, you can set automatch on an opportunity-by-opportunity basis. Note: this field works in conjunction with the Automatch Enabled setting in GOapply Settings. Both must be Yes for the scholarship automatch to run for the opportunity. For more information on GOapply Scholarship Automatch, please see the Scholarship Automatch knowledge article.
Fiscal Year: Data from this field will map to the request records created from submissions on this opportunity, and it will appear on the opportunity “home page”.
Internal Phase Contact (user): This is a lookup to a User (not a Contact) who will receive GOapply notification emails, including submission confirmations. This user will also be the sender for submission confirmation emails and must allow emails to be sent on their behalf. This is an optional field that lets you choose someone other than the Foundation Contact (GOapply Settings) to send and receive GOapply notification emails for this particular opportunity. If this field is blank, the Foundation Contact in GOapply Settings will continue to receive GOapply notification emails.
Owner: This field will populate with the user who created the Opportunity record.
Below that, you will see several calculated fields -- Total Submissions, Total Requested ($ amount), Total Awarded, Total Interim Phases, and Final Report Requirement. These fields will auto-update.
Create Phases
Next, create the phases in your opportunity. From the opportunity record, click +New Phase to add a phase.
Fill in the New Phase form.
- GOapply Opportunity ID: This field will automatically fill in the Opportunity record.
- Phase Name: Required field. Give the phase a name. This is an applicant-facing field.
- Phase Type: Choose from the dropdown.
- Eligibility Phase: This is a phase where you can check applicants' eligibility for the grant
- Letter of Inquiry: A phase where you can collect information relating to the applicant's interest in the grant
- Application: A phase where the applicant fills out the grant application
- Interim Report: If applicable, a phase where you can collect the awarded grantee's interim reporting information. Once the user starts this phase, a Requirement record will be created and associated with the Request. On submission, the requirement received information will be filled in.
- Final Report: if applicable, a phase where you can collect the awarded grantee's final reporting information. Once the user starts this phase, a Requirement record will be created and associated with the Request. On submission, the requirement received information will be filled in.
- Award Agreement: a phase where you can collect the grantee's award agreement information. This phase will not create a requirement record on the associated request
- Other: a phase that does not fall in any of the above categories. This phase will not create a requirement on the associated request.
- Phase Order: single-digit number where 1 = first, 2 = second, etc.
- Advance to Next Phase Automatically: Toggle yes or no. Null = No. If Yes, upon submission of this phase, the opportunity will automatically advance the applicant to the next phase. The phase will appear in their In Progress dashboard in GOapply, and a Status Tracking record will be created and linked to the Request. If the subsequent phase is an interim or final reporting phase, a corresponding Requirement record will be created on the Request. If this option is enabled for multiple phases, each phase will advance once the preceding phase is submitted. Please note that this process will not run if it is enabled for the last phase of an opportunity.
- Phase Due Date: Choose a date and time. The time zone corresponds to what is set in your database settings. (Settings > Personalization Settings > General tab > Time Zone). The date and time (in the applicant's timezone) will appear on the opportunity in the GOapply UI.
- Phase Guidelines URL: paste in a URL where applicants can find tips/guidelines/rules about the phase. Please note that this field will override the Opportunity guideline URL and will appear in a box called Guidelines on the opportunity "home" page.
- Form Definition: This field will populate once you build the form for this phase.
- Transcript Form Definition: Applicable only to Third Party Response opportunities. More information is in the GOapply for Third Party Responses guide.
- Recommendation Form Definition: Applicable only to Third Party Response opportunities. More information is in the GOapply for Third Party Responses guide.
- GOmanager Modified By: This field will autofill with the last user to modify the Form Editor for this opportunity.
On the right side of the page, you have several calculated fields. These fields will autofill/update.
Phase Form Editor
To create the form for this phase that applicants will fill out, go to the Phase's Form Editor tab and click Launch Application Form Editor.
This will open a Form Editor in GOmanager, similar to the form editor you used to create the organization profile.
If the Phase was built after August 2025, the Simple Form Builder will launch by default. For information on using Simple Form Builder, see the GOapply Simple Form Builder Knowledge Article.
For Phases built prior to August 2025, or for Phases copied from a Phase built prior to August 2025, this will launch Advanced Form Builder. For information on using Advanced Form Builder, see the GOapply Advanced Form Builder Knowledge Article.
GOapply Status Tracking
A Status Tracking record is created for each phase of a Request. Most typically, the first status tracking record is created when a GOapply user clicks Apply, unless you are utilizing an invite-only opportunity. For later phases, the status tracking records are created when an akoyaGO user advances to a later phase. GOapply status tracking is available in the navigation panel and is organized into three categories: Active, In-Progress, or Submitted. In-progress status tracking records indicate that the phase is saved as a draft.
Each status tracking record is assigned a unique ID number.
- GOapply Applicant Organization: If org. applicant, this field will fill with the org’s constituent record
- GOapply User: If an individual, this field will fill in with their user record
- GOapply Opportunity: Look up the opportunity record
- GOapply Opportunity Name: Populates based on the related Opportunity
- Request: Created upon submission, looks up to request. Requests also have a GOapply tab where you can find the GOapply Opportunity, Phase, and Submitter.
- Payment or Requirement Number: looks up to a related Payment or Requirement associated with this GOapply Status Tracking record. For reporting phases, this identifies the Requirement that will be updated upon submission of this Status Tracking record.
- Current Phase: Looks up to phase
- GOapply Phase Name: Locked text field that displays the phase name
- Override Phase Due Date: This field allows individual applicants to receive more time to complete the phase. For example, if a phase is due on Friday at midnight but an applicant has experienced extenuating circumstances and needs until Sunday, change the due date using this field, and it will ignore the overall Phase due date in favor of this one. However, once the “override” date has passed, the applicant will no longer be able to submit that phase. If an applicant needs additional time, update the field to avoid complications. Note: if this field contains data, it will appear in the applicant's view of the Phase instead of the Phase Due Date set on the Phase.
- Current Phase Status: Submitted, Draft, or Not Started. If there was an error with the submission, the Current Phase Status will read "ERROR". Submitted means the phase has been submitted successfully. Draft means the phase has been started and contains data, but has not been submitted. Not Started means the phase has been opened, but does not contain any data.
- Progress (%): Tracks the applicant’s progress if in Draft. Progress will read 100% once submitted, regardless of how much of the phase has been completed. However, when in Draft, the progress will be updated with each save.
- Most Recent Submission DateTime: This field will populate with the user's local date and time once the phase is submitted.
- Submitter: Looks up the GOapply user record
- Submitted File: PDF of the completed phase with any attachments appended
- Reviewer File: This is what will be displayed in the review form. If you want to display something other than the submitted phase PDF, upload it here. Please see the GOapply Reviewer Admin guide for more information.
- Form Definition: String of code that represents the form built for this phase. This field contains the form definition that was in the corresponding phase when the user started or was advanced to this phase.
- Form Response: Field populates when this phase has been submitted; contains a json file (string of code) with the related responses entered by the applicant.
- Form Response Draft: Field populates when this phase is "In Progress" and a draft has been saved by the GOapply User; contains a json file (string of code) with the related responses entered by the applicant.
In the Internal tab on Status Tracking Records, you will find:
- GOapply Settings: This field will auto-populate when the record is created with your active GOapply settings. You do not need to change or update the data in this field. It is to support the GOapply email functionality.
- Error Message: In the Internal tab of the Status Tracking Record, the Error Message field will be populated if there are errors during submission. Check this field to find out what went wrong. If you determine that there were mapping errors, you can go into the application and fix the field(s) causing the error.
*Important: after correcting any mapping errors, you will need to use the Diagnostics toolbar action in the affected Status Tracking records to remedy the error and ensure a successful submission. This toolbar action allows foundation staff to resubmit the phase on behalf of the applicant. Please review the options below and choose the one that applies to the error you need to fix.
Diagnostics contains three different functions and is located in the upper command ribbon as a button on a Status Tracking Record:
- Resubmit Application - Allows administrators to retrigger the submission process for an application that may have failed or encountered issues during its initial submission.
- Regenerate Submitted PDF - Used when the submitted PDF of the application is incomplete or contains hidden fields.
- Reprocess Submission Mapping - This diagnostic action re-applies the mapping logic from the submission application to the appropriate CRM fields.
Status Tracking records that are in error will be placed in a system view called Forms with Errors on the GOapply Status Trackings table.
Update Form Definition
It is our best practice to make changes once a grant cycle has closed and there are no applicants/grantees with in-progress drafts. However, if a change MUST be made during an open grant or scholarship cycle, please reference the steps in Editing In-Progress GOapply Phases Knowledge Article.
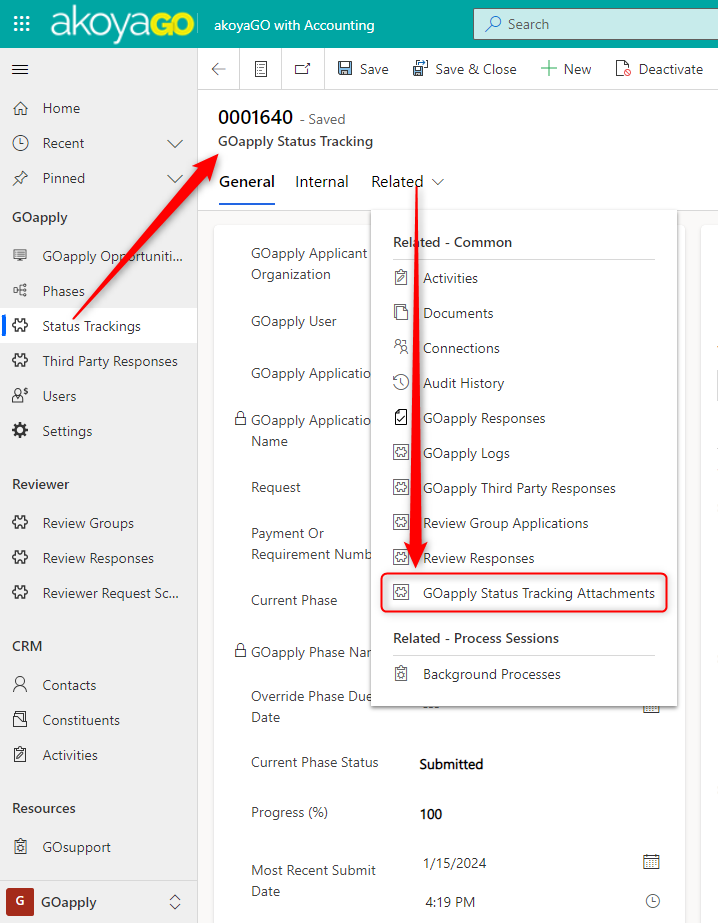
Status Tracking Attachments
Attachments can be found in the Status Tracking Record Attachments tab or the corresponding Request in the Documents tab. The Documents tab of Request will also contain the submitted PDF, as defined by the Document and Attachment settings.
Upon submission, a flow automatically sends the attached files to the corresponding request in Documents. Documents in Request are housed in SharePoint. The flow looks for a document location; if none is found, it creates one, i.e., a new SharePoint folder.
Each attachment has its record. The attachment title will populate the Value field in the Attachment record. The name is dependent on the Document and Attachment settings. Click on the File link to download the attachment. GOapply Status Tracking looks up to the corresponding Status Tracking Record. Anonymous is determined by the Hide from Reviewer setting in the GOmanager field properties, in the akoyaGO dropdown.
Users
This table allows you to view and manage your GOapply Users. Users are automatically created upon registration. At the user level, you can also view their status tracking records.
For organization users, if you have chosen an Applicant Approver method that requires approval, you can reference the system view GOapply Users Pending Approval to see all users awaiting approval (either by Foundation Staff or the GOapply Contact at the organization.)
*Note: akoyaGO team users have read-only access to the GOapply Users table.* - GOapply Settings: This field will auto-populate when the record is created with your active GOapply settings. You do not need to change or update the data in this field. It is to support the GOapply email functionality.
Please note that if you change a User’s Role or Permissions, they will need to log out and then log back in for the change to take effect.
The Email Confirmed field will be set to Yes when the user confirms their email (if your organization uses that process). This field will be locked as it should not be manually set to Yes. The applicant must confirm their email address if the setting is on. Use the system view GOapply Users Pending Email Verification to see which users still need to verify their email.
Manual creation of GOapply Users is not permitted. Please see the Knowledge Article "Add GOapply Users" for further instructions.
In the Internal tab of a GOapply User record, you will see a field called GOapply Settings. This field will auto-populate when the record is created with your active GOapply Settings record. You do not need to change or update this field. It exists to support GOapply email functionality.
Organization Users will have a related Parent Constituent record set upon registration. For Organization Users, this constituent record determines which Status Tracking records a user will see.
Please note that a GOapply User is not directly related to a Contact record.
Impersonate a User
Impersonating a GOapply user allows an akoyaGO user (who is part of the GOmanager Group) to log in as that user in GOapply and perform any actions the user’s permissions allow. For example, if the user’s permission is a contributor, the impersonator will not be able to submit a phase on their behalf without changing that user’s permissions.
Warning: Impersonating more than one user at a time is not supported and will result in data corruption. To avoid this, be sure to Log Out of each impersonation session.
1. In the User record, click Impersonate in the toolbar.
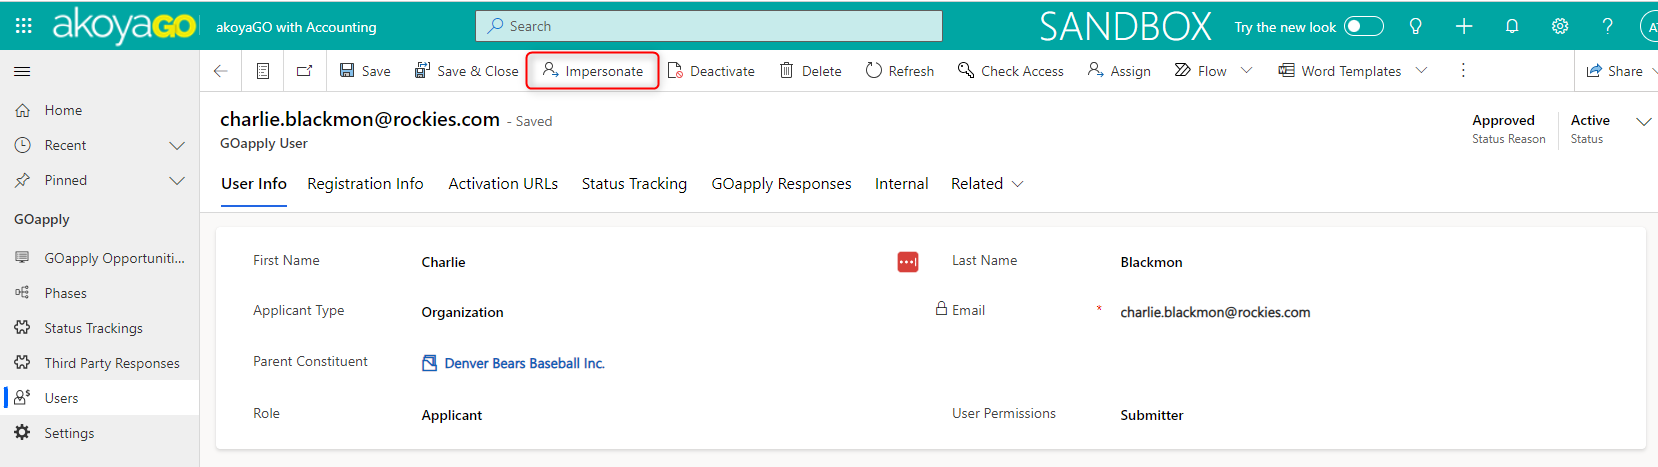
(Conditional) Choose the GOapply site. If your organization uses more than one GOapply site, you can select a site from a dropdown.
2. This will open a new GOapply tab. Click Sign In to open the site you selected.
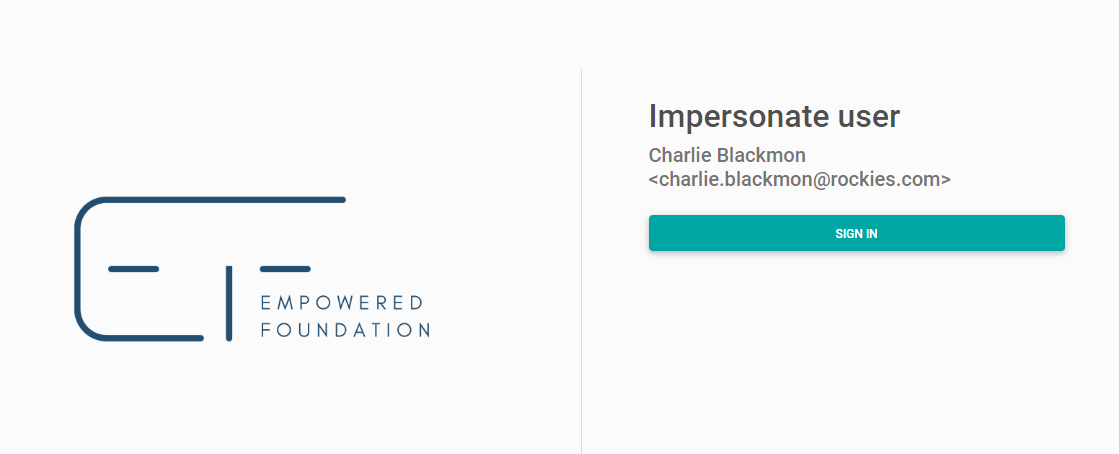
3. You will then be signed in as the user. This will be indicated by a red square around the user with “(Impersonating)” next to it.

4. When finished, log out of that user.

GOapply Automations - Buttons & Workflows
There are several automations that work with GOapply.
Invitation Only Opportunities
See the Invitation Only Opportunities Knowledge Article for step-by-step instructions on completing this process and running the invitation only flow.
Duplicate Opportunity
It is akoyaGO best practice to have a unique Opportunity for each grant or scholarship round. You can duplicate an Opportunity and all its phases from a GOapply Opportunities view or directly from the Opportunity record. This action exists as a command bar button. Simply click the button, and the process will run in the background. The new Opportunity will appear in the list after a refresh. It will be named "Copy of [opportunity name]".
Create All GOapply Requirements - FlowThis flow exists on Request and creates a requirement for every Interim Report or Final Report phase on the Opportunity. This flow will also create corresponding status-tracking records for each reporting phase. As such, once a status-tracking record exists, applicants will be able to see the new phases as they become available on their In Progress dashboard. If you use this flow, you are making all report phases available to the GOapply user.
Advance to the Subsequent Phase(s)
Using a command bar action on Request records or a Request view, advance applicants to the next phase, the final report phase, or a phase of your choosing of the Opportunity. This will allow you to pick and choose what phases are available to the GOapply user.
From the Request or from a view of Requests, click GOapply Advance To and choose an option.
Using this tool creates a Status Tracking record for the next phase in the GOapply Opportunity based on the Phase you choose. The applicant will see the phase available in their In Progress dashboard in GOapply. If the phase is an interim or final reporting phase, a requirement record will be created and linked to the request and status tracking record.
If Final Report Phase is selected, a status tracking record will be created for the Request(s) for the Phase where Phase Type = Final Report.
If Choose Phase is selected, a dialog box will appear where you can select the phase of the selected opportunity to which you want to advance.
If Next Phase, a status tracking record will be created with the next sequential numerical value in the Order field on Phase.
Note on opportunity type: This tool uses the Opportunity Type field in the Opportunity record to determine how the Status Tracking Record is populated. If the Opportunity Type is Organization, the workflow will fill in the GOapply Applicant Organization field on the Status Tracking Record. If the Opportunity Type is Individual, the workflow will fill in the GOapply User field on the Status Tracking Record. If the Opportunity Type is Both, the workflow will populate both the GOapply Applicant Organization and GOapply User fields on the Status Tracking Record.
GOapply Logs
In the Activities table, there are several System Views related to GOapply Logs:
This will show all activity in GOapply, including activity from GOapply for Third Party Response (if applicable). User metrics are also recorded and stored in a dashboard in your akoyaGO CRM called GOapply Usage Metrics. The dashboard contains recent submissions, recently viewed opportunities, recent sign-ins, and recent password resets.