

Revised 06/26/2026
- GOapply Reviewer Components
- Create a Review Group
- Add Reviewers
- Review Forms
- Add Submission to Review Group
- Testing
- Reviewer Responses
GOapply submissions can be reviewed by both internal and external reviewers using the GOapply review features. These features allow the user to create and manage specific review groups for particular phases of their submitted Opportunities. In addition, GOapply Users can be made reviewers and can be added to as many review groups as necessary.
The GOapply review features are divided into several components, which are available in the left-hand navigation pane in the GOapply area.
We offer a Suggested Learning Course for the GOapply Reviewer, which includes several instructional videos. GOapply Reviewer Course
For a demonstration of the review process from a GOapply Reviewer's point of view, please see the GOapply Reviewer User Video
GOapply Reviewer Components
GOapply Reviewer references many tables that you may already be familiar with from using GOapply. Users, Opportunities, Phases, and Status Tracking Records are used in Reviewer, along with several Reviewer-specific tables such as Reviewers and Review Groups. Below is a high-level overview of Reviewer tables, which will be covered in more detail later in this document.
USERS
Reviewers are GOapply Users with a role of "Reviewer" or "Applicant and Reviewer."
To create GOapply Users for Reviewers, there are two options:
1. The Reviewer can register for a GOapply account independently through the individual registration process in the GOapply UI. If reviewers register on their own, the process is the same as for individual applicant registration. More information about creating an individual account via GOapply is available here: GOapply User Experience - Create a New Account.
2. An akoyaGO user creates their GOapply user records for them using the Add GOapply Users process. Steps for manually creating GOapply Users are also linked later in this document.
OPPORTUNITIES AND PHASES
On a Review Group, you will list an Opportunity and a Phase. You can see which Review Groups an Opportunity or Phase is related to by choosing Related > Review Groups
STATUS TRACKING IN REVIEWER
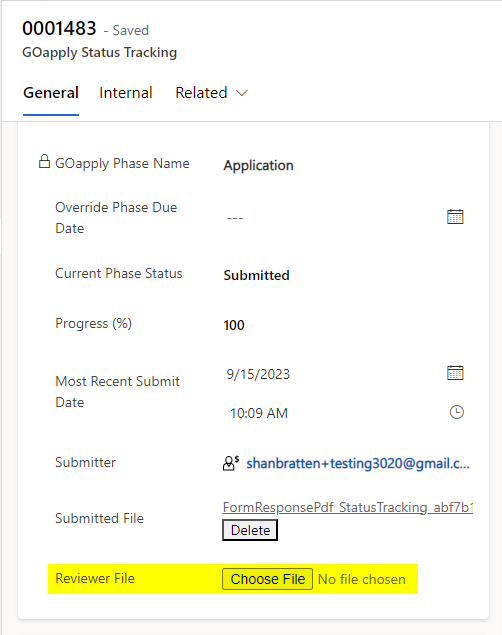
Status Tracking records indicate which Reviewer phases/applications are ready for review.
Users with a GOapply Administrator Security Role can upload an alternative file to display to the reviewer. From the Status Tracking Record, there is an upload field called Reviewer File. Here is where you would upload what you want the reviewer to see if it differs from the submitted PDF. This file will override the submitted PDF.
REVIEWERS
Reviewers are all GOapply Users with the Reviewer or Applicant and Reviewer roles assigned.
REVIEW GROUPS
Review Groups will be set up for each Review cycle. This is where you link the people who will review (Reviewers) with the submissions they will review. Please note that Reviewers will not have access to any submissions until they are added to the Review Group.
REVIEW GROUP APPLICATIONS
Review Group Applications is a hidden table. Review Group Applications use the GOapply Status Tracking record to display the submission for the reviewer. If the GOapply Status Tracking record does not exist or does not contain a PDF application, the submission will not display correctly in the reviewer dashboard.
REVIEWER DASHBOARD
In all areas of akoyaGO CRM, a System Dashboard called the GOapply Reviewer Dashboard that tracks applications that need to be assigned to a review group, applications with a conflict of interest, applications with scores from review groups, and active reviewer request scores.
Create a Review Group
Each review group consists of general info (including the Opportunity and Phase), settings to determine what reviewers can see, the reviewers themselves, and the submissions they will review. All of these components are necessary for reviewers to have everything they need.
The following steps outline the process for creating a completed review group.
1. From the Review Group table, click “New Review Group.”
The New Review Group form will load.
2. Name your review group. It is our best practice to create a Review Group for each review cycle. For example, if my organization reviews Program Grants in the Spring and the Fall, I might name my Review Group something like Spring 2027 Program Grant Review, so I can easily identify which review group reviewed each program grant.
3. Select the opportunity and phase that the review group will be assigned to review. It is our best practice that each review group will review one opportunity and phase. However, if your review group will be reviewing multiple phases, there are steps in the Manually Adding a Status Tracking section at the end of this Knowledge Article.
4. Select a Scholarship, if applicable. If a scholarship is selected, when applications are assigned to the review group, any supplemental forms will be added to the Attachments tab of GOapply Reviewer. This is helpful for review groups evaluating applications for a specific scholarship.
5. If you would like to set a due date, set a review group deadline in the Review By field. Once the Review By date has passed, the review group will no longer appear in the reviewer’s list in GOapply. This field is optional.
6. Lead Reviewer Recommends: This setting allows your lead reviewer to recommend which application gets awarded, and if awarded, the amount awarded. This feature will apply ONLY to the reviewer whose Lead Reviewer field is set to Yes. Choose from the drop-down
No (or null): This feature is turned off
Recommend to Request: If selected, this setting maps the lead reviewer's choices to the associated Request record. When this option is selected, an additional question will be added to your reviewer form titled "Recommended Award Status."
The lead reviewer can choose Award or Deny. If an Award, an additional Recommended Amount field will be added where they will enter the amount they recommend awarding. The amount field will be required.
Once submitted, their choices will be mapped to the Request. A field called Review Recommender will populate with the GOapply User (Process tab > Decision section).
The Recommended Grant amount will also fill in with the amount they recommended. Their choices will also map to the Review Group Application.
Recommend to Review Group: If selected, this option will also add the Recommended Award Status (and Recommended Amount field if Award) questions to the review form. This option will also map the lead reviewers' choices to the Review Group Application. This option will NOT fill in any field on the request.
7. Click Save to create the Review Group. Click the Settings tab of the newly created Review Group to continue choosing additional settings for this Review Group.
Note: the Review Form Definition field will auto-populate based on what is built in the Form Editor. You do not need to upload anything here:
The Settings tab contains various customization options for each review group. These settings involve the information you wish to share with the reviewers. All but Anonymous Reviews will default to Yes. Anonymous Review will default to No. Scoring Type will default to Sum (total score).
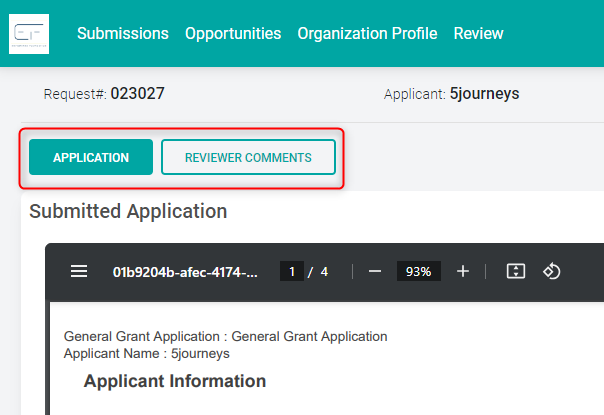
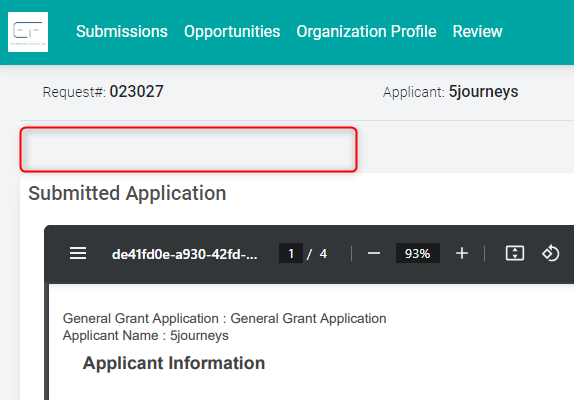
Show Other Reviewers Comments: If Yes, the Reviewer Comments button will be visible on the application review form. If set to No, the Reviewer Comments button will not be visible on the application review form. Please note that if Show Other Reviewers Comments is set to No, the Show Reviewer Weighted Score setting is rendered null, and the Public setting in Form Builder will also be null. For more information on the Public setting, see Question Properties.
If Show Other Reviewers' Comments is Yes:
If No:
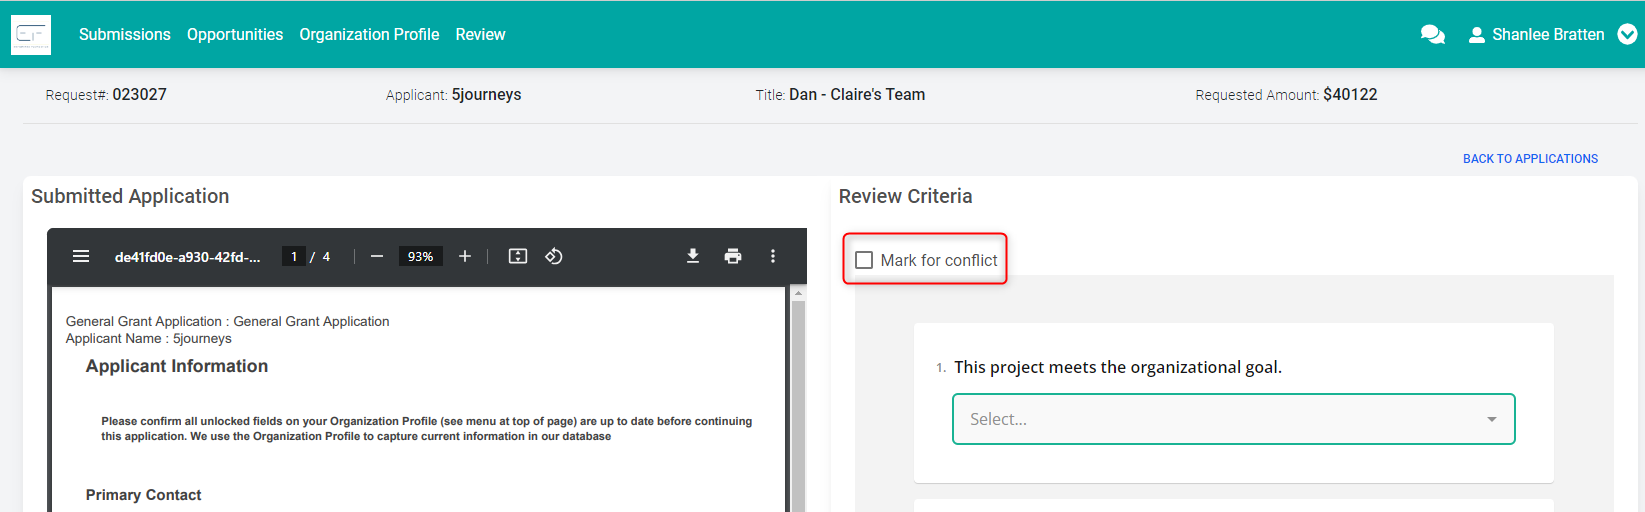
Show Mark for Conflict of Interest: If set to Yes, the Conflict of Interest checkbox will appear on the Reviewer’s review form. If set to No, the Conflict of Interest checkbox will not be visible on that form.
Anonymous Review: Select Yes to remove applicant names from the application. If Yes is selected, the applicant’s name will be removed from the following: the PDF displayed to reviewers, the application header, and any Request/Primary Contact and/or Request Applicant view columns in the list of applications in the review group.
Please note that the Anonymous Review setting will NOT hide specific phase fields that include the applicant's name UNLESS the Hide from Reviewer field property is set in the Form Builder. For more information on the Hide from Reviewer setting, reference the GOapply Simple Form Builder Knowledge Article.
Show Reviewer Weighted Score: If Yes, reviewers will be able to see how other reviewers scored the application. It renders as the far right column in the Reviewer Comments. If No, the weighted score column is not visible in Reviewer Comments.
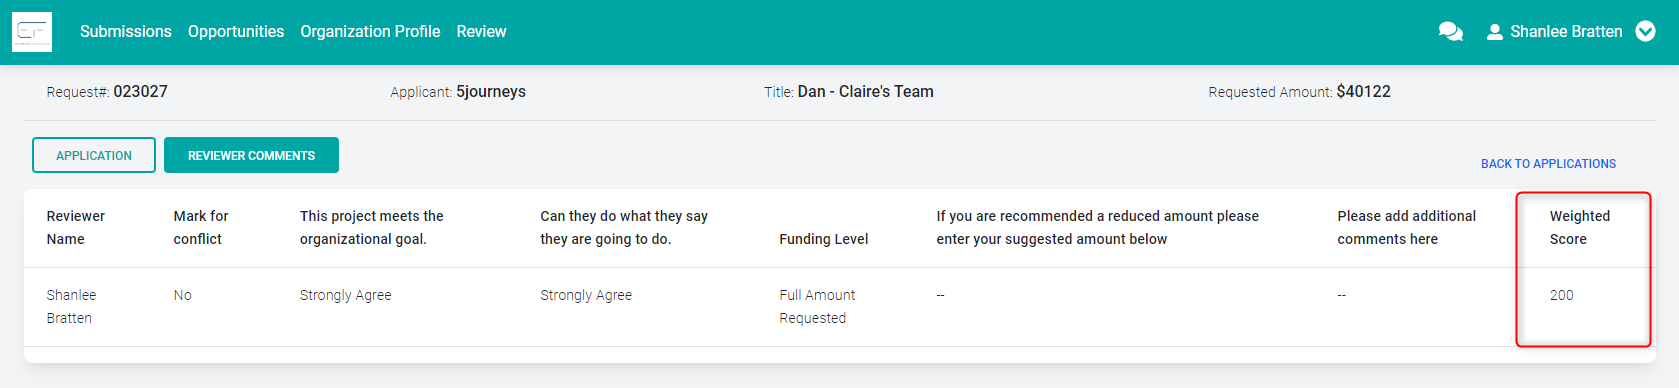
*Please note that even if the Show Reviewer Weighted Score has been set to NO, the Reviewers will still see the "Score" column on the Applications to Review page in the GOapply UI:
The columns shown here are driven by the System View "GOapply Review," accessed through the Review Group Application table. A System Customizer user can adjust this System View as needed to control what columns and records the external GOapply Reviewers see. For example, deactivating a record in that view would remove it from the list of applications that the reviewer sees. If you customize the columns in the System View, such as removing the Score column, those changes will affect the columns the Reviewers see in their Dashboard in the GOapply UI.
Scoring Type: Choose Sum, Average, or Sum by Reviewer, then Average by Application.
- If the Sum (total score) is used, each question will be equally weighted, and the Reviewer's score will be the total of the Reviewer’s answers. With the sum selected, you can set the point value for each choice for a question in the Choices section of the question's properties in Form Editor. See the Set Scoring section of this document for more information.
Here is an example of Sum Scoring Type:
Each Reviewer's score was calculated by summing the point values of each question. The final score was calculated by summing each Reviewer's score.
- If Average, you can set the weight of each question in its properties, in the akoyaGO section. More information on setting a question's weight can be found in the Question Properties section of this document.
Here is an example of Average Scoring Type:
Each Reviewer's score was calculated by averaging their answers, with each question's weight accounted for. The final score was calculated by averaging each reviewer's score.
- If Sum by Reviewer, then Average by Application, the scores will be averaged by adding all the scores from each reviewer, then dividing by the number of reviewers.
Here is an example of Sum by Reviewer, then Average by Application:
Each reviewer's score was calculated by summing the point values of each question. The final score was calculated by averaging each reviewer's score.
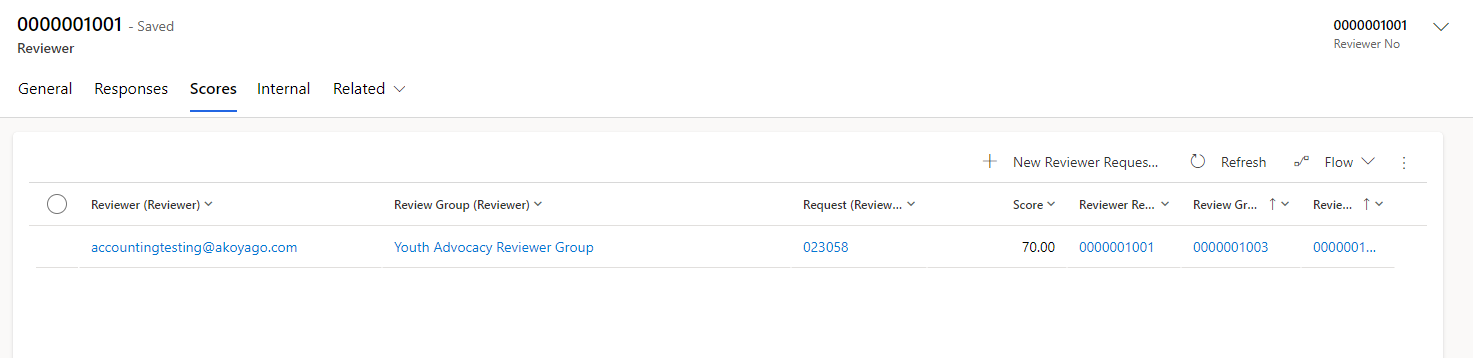
The final score for each Request can be found on the Requests tab of the Review Group:
Or directly from a Review Group Application record:
Scores will also appear in the Reviewer's list of applications, so they can see all scores for each application they reviewed in one place.
*Please note this column will show regardless of the Show Reviewer Weighted Score field. This column is hard-coded and cannot be removed at this time.
Show Individual Score: If Yes, reviewers will be able to see their score for each application (either the sum or the average, depending on the Scoring Type), labeled "My Score". If No, the "my score" column is not visible.
Enable Review Download: If Yes, will allow reviewers to download the Review PDF Document in the GOapply UI.
If Enable Review Download is No (cannot download Application PDF):
If Enable Review Download is Yes (allows the Reviewer to download Application PDF):
Allow Individual Attachment Downloads: If Yes, will allow reviewers to download a copy of the
If Allow Individual Attachment Downloads is No (cannot download attachments uploaded by the applicant):
If Allow Individual Attachment Downloads is Yes (allows reviewers to download attachments uploaded by the applicant):
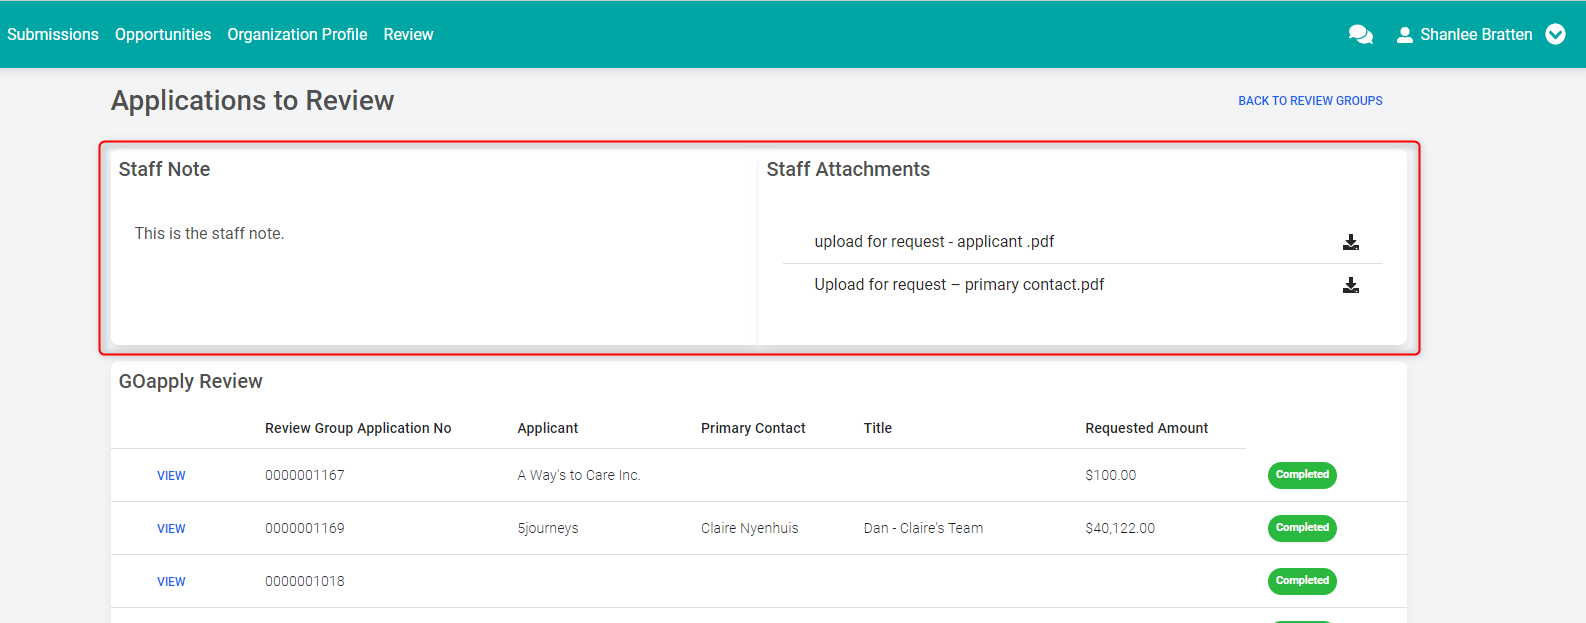
The Staff Attachments and Comments tab in the Review Group record allows staff to add notes that apply to ALL applications for that review group. Attachments can also be added here as public documents for the review group.
These notes and attachments are displayed above the review group applications.
Duplicate Review Group
GOapply Review Groups have command bar buttons that duplicate the review group or the review group and its reviewers.
If you need to duplicate a Review Group and plan to add new Reviewers, use the Duplicate Review Group button.
From the Review Group form, choose the Duplicate Review Group command bar button.
You will be prompted to name the new review group.
This function duplicates the application, phase, review by date and time, review form definition, review form, and all properties, all settings, show staff comments and attachments setting, and staff notes.
If you will be reusing a Review Group and plan to keep the same reviewers, use the Duplicate Review Group + Reviewers command bar button.
Give the new review group a name.
This process will duplicate everything the above process does, except it will also add all existing reviewers as members.
Add Reviewers
Reviewers are GOapply users who will evaluate applications in their review groups. Reviewers must be added to each review group in which they review applications. To be added to a Review Group, the user(s) must have the Reviewer or Applicant and Reviewer role.
Add in Bulk:
From a GOapply Users view, select the users you wish to add to the Review Group. Then click the Add to Review Group command bar button.
Next, you will see a pop-up box labeled "Add to Review Group." Select a review group from the dropdown list provided and click Submit. Please note that only active review groups will appear in the list.
Once the users are added to the Review Group, you will see a success pop-up.
*Please note that if you run this process on a user whose Role does NOT include Reviewer, they will be switched to the Applicant and Reviewer roles.
Add Individually:
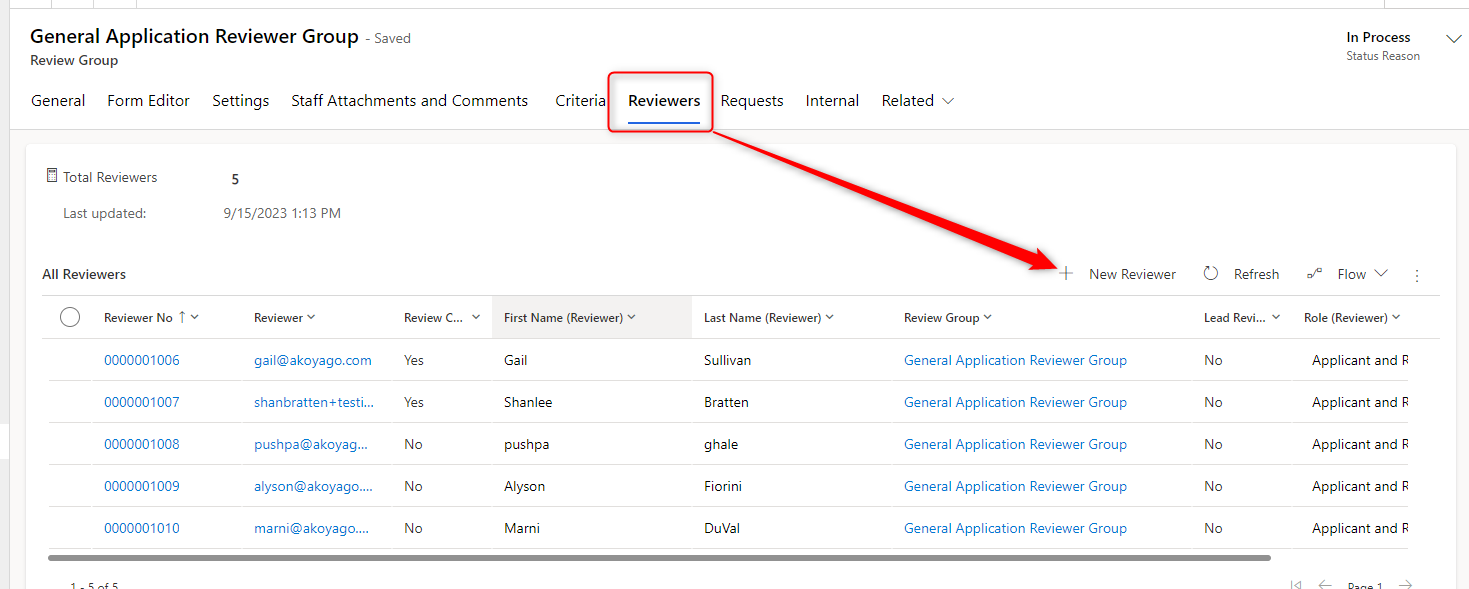
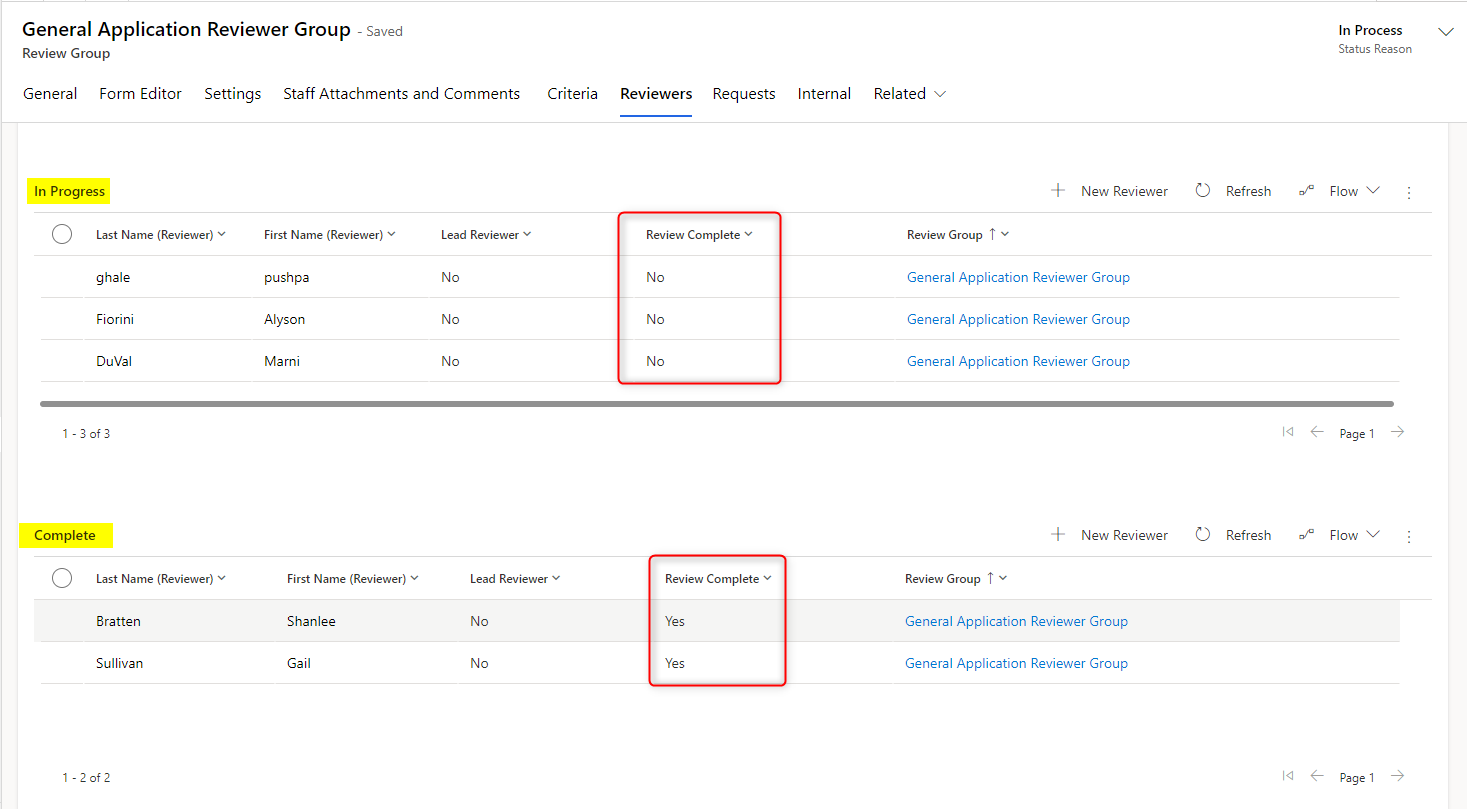
From the Reviewers tab of the review group, click New Reviewer in the All Reviewers subgrid.
The New Reviewer form will populate with the review group information. Review Complete and Lead Reviewer will default to No.
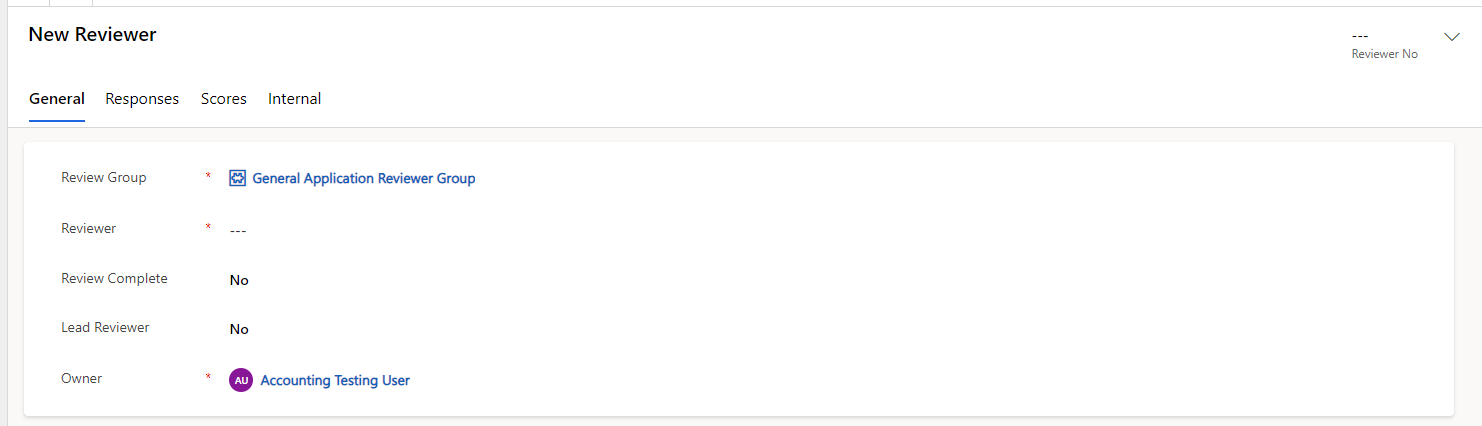
Select a GOapply User in the Reviewer field. If the user is the lead reviewer, make that designation in their reviewer record. Lead Reviewers will be able to see all reviewers' comments regardless of the Show Reviewers Comments setting in the review group settings. Please note that the intended functionality is to have one lead reviewer per review group. If you try to set another reviewer as the lead reviewer, it will override the previous lead reviewer.
Review Complete: This field automatically flips to Yes when the Reviewer has completed reviewing all applications in all review groups they are assigned to.
The Reviewers tab of the Review Group record has three subgrids: All Reviewers, In Progress, and Complete.
- All Reviewers shows the Reviewers assigned to the group and includes a Review Complete column that will read Yes or No.
- In Progress shows the Reviewers who have started the review process but have not submitted all their assigned reviews.
- Complete shows the Reviewers who have completed all their assigned reviews.
When Review Complete is set to Yes, the Reviewer will receive an email thanking them for completing their review. This email is determined by an Email Template called 'GOapply Reviewer Completed Email'.
Bulk Import
Rather than adding reviewers one by one, akoyaGO users can bulk-import reviewers using the GOapply Add Users table. Steps for this can be found in this related Knowledge Article: Add GOapply Users
Add GOapply Users Manually
You can also manually add users to the Add GOapply Users table on a one-off basis. If you have fewer than approximately 20 GOapply users, you may find creating them this way is less work than completing a bulk import.
Click the +New command bar button.
Fill in the form.
First Name: The GOapply User's First Name
Last Name: The GOapply User's Last Name
Applicant Type: Required field; choose Individual or Organization. When creating Reviewers, set the Applicant Type to Individual.
Parent Constituent: This field appears and is required only when the Applicant Type is Organization. Select the constituent in akoyaGO for whom this user will be applying.
Email: Required field; enter the GOapply User's email address. An email will be sent when you run the flow to create this person as a GOapply user (see the Bulk Import Users section below for more information). This is the email address the user will use to log in.
Role: Required field; choose Applicant, Reviewer, or Applicant and Reviewer. This field determines how GOapply will appear to this user. If set to Applicant, the user will see items related to applying in the GOapply UI, such as Opportunities, In Progress drafts, and past Submissions. If set to Reviewer, they will see Review Groups. If set to Applicant and Reviewer, they will see both.
User Permissions: Required field; choose Submitter or Contributor. Make sure to set this to Submitter when creating Reviewers, so they can submit their Reviews. This field should be set to Contributor for Organization users who should only contribute to an application. (They cannot submit.)
GOapply Settings: Required field; indicate a specific GOapply Site that the new user will be directed to for registration.
Review Forms
Review forms are displayed for the reviewer side by side with the application. Question types include a text field, a radio button, a drop-down, a long-text comment, and a rich-text editor. For example, below you’ll see the submitted application (or whatever is in the Reviewer file tab of the Status Tracking record) on the left, and the reviewer’s questionnaire on the right. At the bottom of the page, they can save a draft or submit.
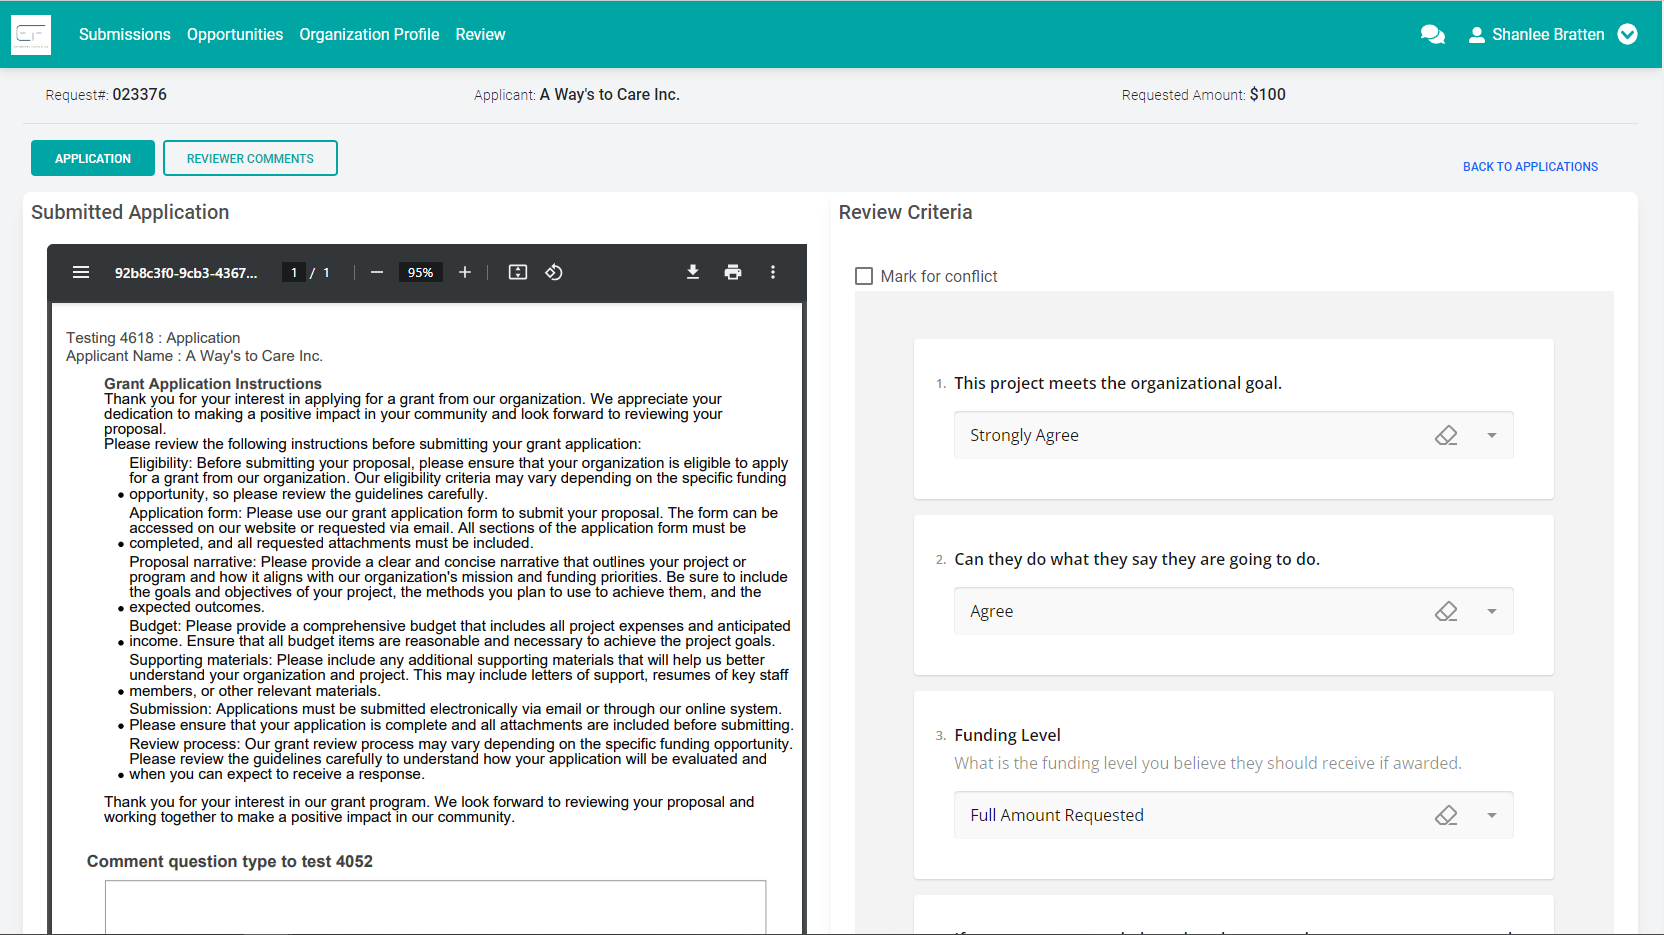
When the applicant uploads attachments to their application, and those file upload fields are NOT set as Hide From Reviewer, the Reviewer can view those attachments in the in-line document viewer.
When attachments are present, a new tab labeled Attachments will appear at the top of the review form. Reviewers simply click the file name on the left to view it on the right. Note that in the case of a scholarship application, this is also where the transcript/recommendation form submission PDFs will appear. As mentioned above, this is also where any supplemental scholarship forms will appear if the Review Group has been assigned a scholarship.
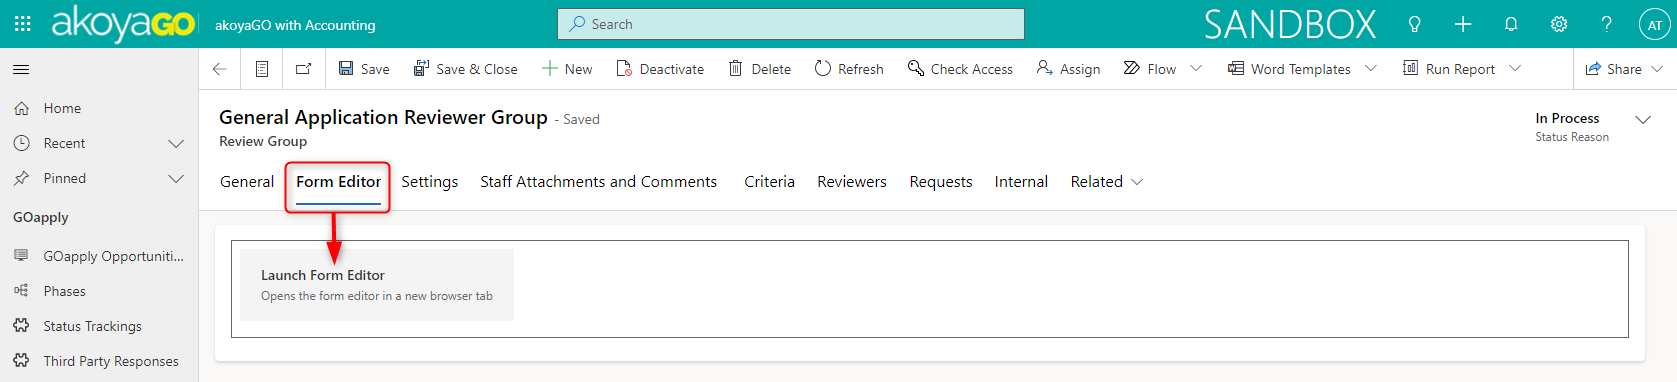
From the review group, navigate to the Form Builder tab. Select Launch Form Editor. Please note you must be a member of the GOmanager Security Group to access the GOmanager Form Editor.
The Form Editor will load in a separate tab.
As of April 2026, Review Forms are built in the Advanced Form Builder. On the right-hand side, you will see the 6 question types. Drag and drop the question types from the toolbox into the form to add.
Some primary differences between building a GOapply Phase and Review Form include:
- Review Forms only support one page. Please ensure your form is designed to account for this.
- No mapping is required for Review Forms. All answers submitted by reviewers will automatically map into the Review Responses table in akoyaGO and can be viewed via out-of-the-box Reviewer Reports (more information included below)
- The default character limit for Review Responses is 2000 characters. If you believe your Reviewers will need to type more than 2000 characters, a System Customizer user can adjust the Maximum Character Count of the Response column on the Review Responses table. More information on adjusting column properties can be found here: System Customizer One Suggested Learning Course; Column Properties
- You will see fewer Toolbox options and fewer Question Types to choose from. These are outlined in the section below.
- If the Lead Reviewer Recommends setting in the Review Group settings is set to Recommend to Request or Recommend to Review Group, two additional questions will appear on your form. You do not need to add these to the form; they will be added automatically based on the Lead Reviewer Recommends setting.
There are five types of questions: a text field, a radio button, a drop-down, a long text comment, and a rich text editor. Please note that only RadioGroup and Drop-Down field types can have score values assigned.
Single Input: a text or number response field. These fields cannot be used to calculate scores.
Radiogroup: a single-selection radio button style multiple choice. These responses can be assigned scores.
Drop Down: a drop-down list of responses. These responses can be assigned scores.
Comment: a long text or number response field. This field cannot be used to calculate scores.
Because Review Responses in akoyaGO have a maximum character count of 2000, we recommend setting the Maximum length for any Comment questions in the Form Builder to 2000 characters or less to prevent Reviewers from encountering potential errors upon submission.
You can do this from the Validation section:
Editor: A field that is usually used to convey information to the applicant. This field cannot be used to calculate scores.
File: This is a file upload field. Add this field if you want reviewers to upload files. Supported file types include 'txt', 'rtf', 'doc', 'docx', 'xls', 'xlsx', 'png', 'jpg', 'jpeg', 'gif', 'csv', 'ppt', 'pptx', 'pdf', 'mp4', and 'heic'. The maximum upload size is 20 MB. When a reviewer uploads a file with their review form, it will be stored in the Review Response record for that question. For example:
If the question type is used to calculate reviewer scores, the scoring must be included among the choices for that question.
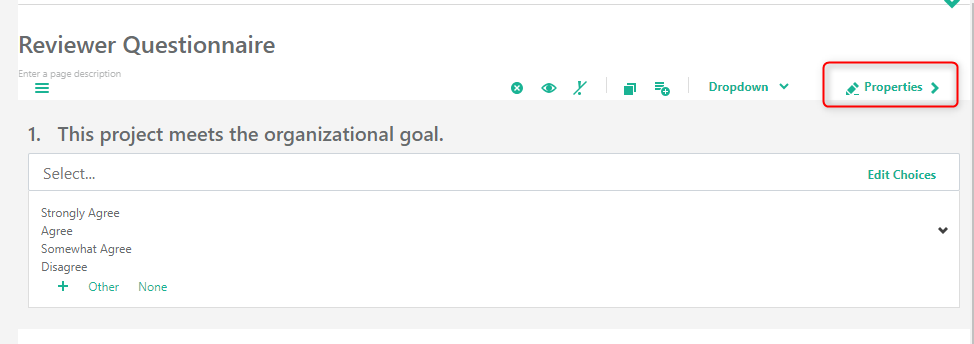
Each question field has a properties menu. Open properties by clicking on the question and selecting Properties from the far right.
Common settings for each criterion include:
Required: The required setting is in the General dropdown, as a toggle labeled “Is Required?” If on, these criteria must be completed for the reviewer to mark the review as “complete.” Required criteria will be denoted with an asterisk in the review form. Required will default to no.
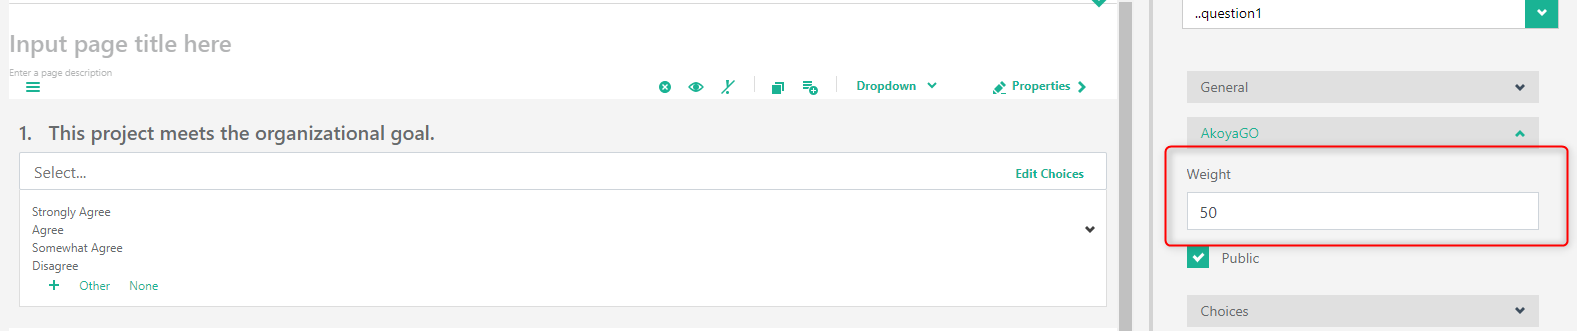
Weight: available under akoyaGO. This functionality is available only when the Scoring Type in the Review Group’s settings is set to Average. If the criteria are averaged, enter the weight of the score. Note: if averaging is used, the weights of all criteria must total 100.00.
Public: This setting can be found in the akoyaGO dropdown. If checked, the criteria responses will be shared with the review group in the Reviewer Comments tab. Note: the review group setting Show Other Reviewers Comments must also be turned on for this to appear. The Lead Reviewer will be able to see all reviewer responses.
Scoring can be set only for dropdown or radio group question types.
1. In the Properties for the scoring field, drop-down Choices
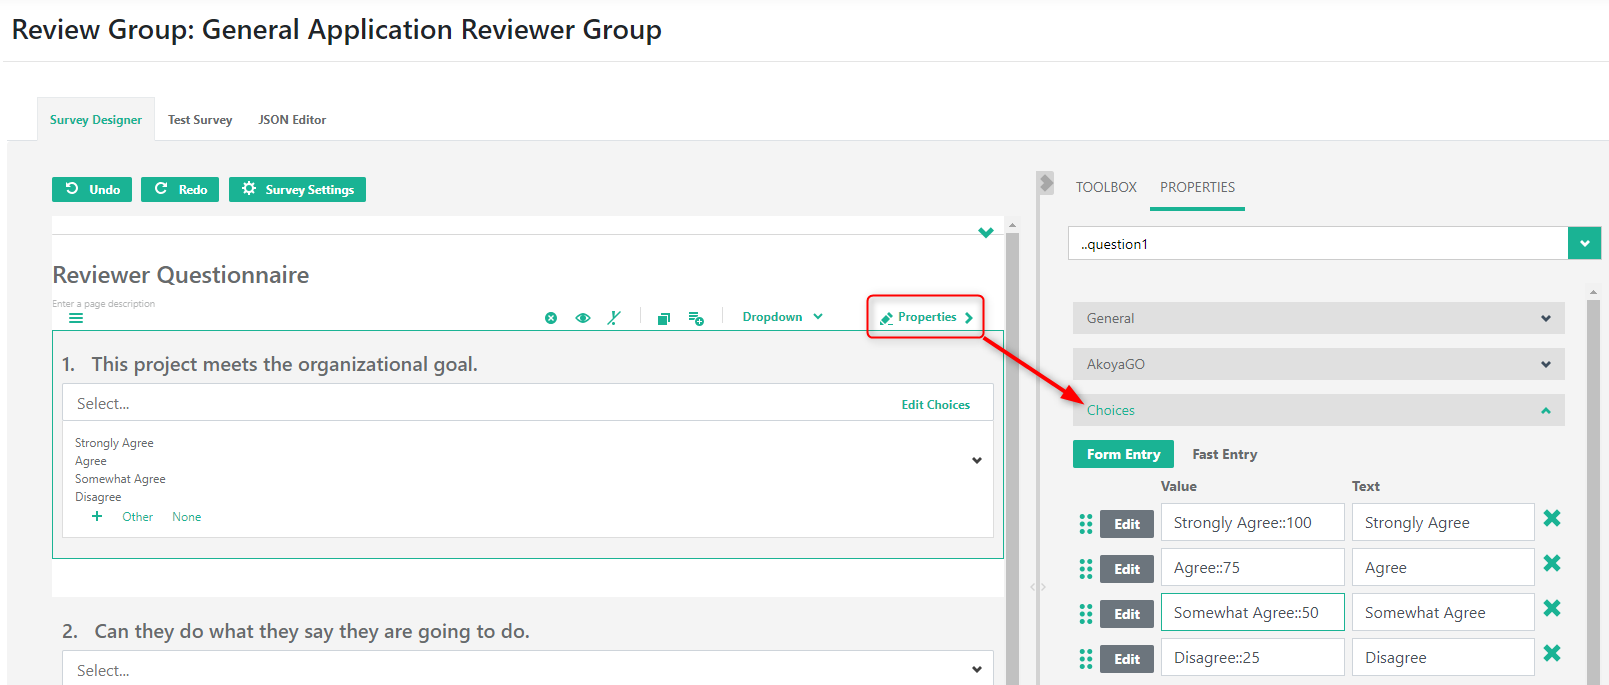
2. For Value, enter the option, then two colons, then the numerical value of that choice. The proper format for this formula is no spaces. For example, Agree::80. In the Text field, simply enter the option that you want the reviewer to see. In this example, you’d just put Agree. Repeat this process for each option in the drop-down.
If your Review Group settings set the scoring type to Average, you will see a Weight property under the akoyaGO section. Here is where you will set the weight of each scored question. Weight is only available for drop-down and radio group question types.
3. Once you have added all questions, click Save at the bottom of the Form Editor or wait for auto-save to take place.
Back on the Review Group in akoyaGO, you will notice that the Review Form Definition field now contains its unique code and is locked to prevent accidental deletion. This Form Definition JSON File will be created & locked upon entering the Form Editor and saving a copy of the Review Form. To download the Review Form Definition, click the link in the field.
Add Submissions to Review Group
Now that you have created your review group, designated reviewers, and created the review form, it is time to add the submissions for the reviewers to review. There are four supported ways to do this, as well as one manual way detailed at the end of this section.
The +Add Pending Requests button is accessed directly from the Review Group to add in bulk.
This button searches for GOapply Status Tracking where the status is Submitted, the Opportunity and Phase match those assigned to the Review Group, and the Request Status is Pending or In Review, then adds Review Group Application records for each Request that matches the criteria. For Scholarships, a new lookup field has been added to Review Groups for Scholarship. If this field contains data, the tool will look for Requested Scholarship records for the assigned scholarship with a Status Reason of ‘Opted-in’, in addition to the above criteria.
In summary, this button will search for anything awaiting a decision that matches the Opportunity, Phase (and Scholarship, if applicable), and add them in bulk.
After clicking the +Add Pending Requests button from a Review Group button, you will receive the following success message:
To check which Requests were added to this Review Group, click on the Requests tab:
If you prefer to manually select submissions to add to the Review Group, choose one of the three options below.
The second option is to add submissions directly from a Request record or Requests view:
If you have more than one Review Group reviewing the set of applications, you should not use the flow mentioned above. Instead, you will want to pick and choose which Request records each Review Group will review. You can do this for multiple Requests from a view, or an individual Request record by clicking the Add to Review Group command bar button. You may want to create a Personal View that filters by columns such as GOapply Opportunity and GOapply Phase.
Here is the button from a View on Requests:
The button is also available on an individual Request record:
When you click this button, you will be asked to select the Review Group you would like to add the Request(s) to:
*Note: This function validates based on the GOapply Opportunity and Phase set on the Review Group. For example, if you have an LOI Phase and an Application Phase submitted for this Request, the correct Phase will be chosen based on the setting in the Review Group.
This also means that if the phase is different from what is set in the Review Group, you will not be allowed to add Requests this way. If you need to add a Request to a Review Group that does not match the Phase and Opportunity set on the Review Group, you will need to do it manually. Instructions for manually adding a Status Tracking record to a Review Group are at the end of this section.
You also have the option to add submissions from a Status Tracking record and Status Tracking view. You can do this for multiple Status Tracking records from a view, or from an individual Status Tracking record by clicking the Add to Review Group command bar button. You may want to create a Personal View that filters by columns such as GOapply Opportunity and GOapply Phase.
Here is the button from a View on Status Tracking:
The button is also available on an individual Status Tracking record:
When you click this button, you will be asked to select the Review Group you would like to add the Status Tracking record(s) to:
*Note: This function validates based on the GOapply Opportunity and Phase set on the Review Group. This also means that if the phase differs from what is set in the Review Group, you will not be allowed to add Status Tracking records this way. If you need to add a Status Tracking to a Review Group that does not match the Opportunity and Phase set on the Review Group, you will need to do it manually. Instructions for manually adding a Status Tracking record to a Review Group are at the end of this section.
Your last option is to add submissions from a Requested Scholarship record. You can do this for multiple Requested Scholarship records from a view, or from an individual Requested Scholarship record by clicking the Add to Review Group command bar button. You may want to create a Personal View, filtering by columns such as Scholarship and the GOapply Opportunity and GOapply Phase from the related Request. This option is particularly useful if you have different Review Groups set up for each Scholarship.
Here is the button from an individual Requested Scholarship record:
Here is the button from a View of Requested Scholarships:
When you click this button, you will be asked to select the Review Group you would like to add the Requested Scholarship(s) to.
You can also access Requested Scholarship records from a Scholarship record by choosing Related > Requested Scholarships.
*Note: This function validates based on the GOapply Opportunity and Phase set on the Review Group. This also means that if the phase differs from what is set in the Review Group, you will not be allowed to add Requested Scholarship records this way. If you need to add a Status Tracking to a Review Group that does not match the Opportunity and Phase set on the Review Group, you will need to do it manually. Instructions for manually adding a Status Tracking record to a Review Group are at the end of this section.
If you would like to add a submission that does NOT match the GOapply Opportunity and Phase set for the Review Group, you must do so manually.
1. Starting from the submitted Status Tracking record, click on the Related tab, and choose Review Group Applications.
2. Click +New Review Group Applications
3. The New Review Group Application form will open and autofill the Request and Status Tracking field. All you need to do is assign the Review Group. The Recommended Amount and Recommended Award Status fields will only populate if the Lead Reviewer Recommends setting in the Review Group is set to Recommend to Request or Recommend to Review Group. If this setting is not being utilized for the review group, those fields will not auto-populate. Save.
Now, the submission(s) you just added will appear in the review group’s dashboard in GOapply. Repeat this process for each submission that the review group needs to review.
*Please note you must have the GOapply Administrator Security Role to complete the following steps*
If you accidentally added submissions to the Review Group that should NOT be reviewed, you can remove them directly from the Requests tab of the Review Group:
Select the Review Group Application(s) that you would like to remove and click Deactivate:
The Reviewers will no longer see this submission.
Testing
Reviewer Responses
Reviewer responses are recorded in the Review Responses table, Reviewer Request Score table, the Reviewer Scores tab of the Review Group Application table, and in the Responses tab of the Reviewer record.
Review Responses is a table (not included in site navigation) that stores every response from each reviewer. For example, if your reviewer form has five questions, every time a reviewer submits the form, five reviewer response records will be created.
Review Responses can be found in the Responses tab of a reviewer record or the Related tab of the Review Group record.
Inside a Review Response record, you will see:
- Question Type: the type of question from the Form Builder toolbox, i.e., radiogroup, dropdown, text, file.
- Question: The name of the question
- Response: The choice selected or the comment entered by the reviewer
- Reviewer: A lookup to the Reviewer record
- Review Group: A lookup to the review Group record
- Request: A lookup to the associated Request record
- Review Group Application: A lookup to the Review Group Application Record associated with this response
- Status Tracking: A lookup to the associated Status Tracking record
- Public: Whether this question was Public or not (a property in Form Editor)
- Score: What the associated score was for the choice made by the reviewer
- Weight: The weight that this question carries
- Conflict of Interest: Whether or not this submission was a conflict of interest
Reviewer Request Score records contain:

- Reviewer: A lookup to the Reviewer record
- Review Group Request: A lookup to the Review Group Application record
- Reviewer Form Response: A reviewer form response JSON file
- Score: The score is attributed based on the reviewer’s answer to the question
Reviewer responses and scores can also be seen from within the Reviewer record.
From a Review Group, you can run a report that shows all responses from all Reviewers for all Requests they have scored. To access this report, choose Reports from the top navigation bar (you may need to click the three dots to expand) and choose GOapply Review Responses:
There is a report to be run that also breaks down this data by Reviewer. It can be run from the Reviewer table.
You can also run a report from an individual Request by choosing Run Report in the top navigation bar and choosing GOapply Review Responses:
Lastly, there are scholarship-specific reports that you can run from a Review Response record or group of Review Responses. To access Review Responses, click on the Responses tab of a Reviewer record, or choose Related > Review Responses from a Request or Review Group.
These reports include:
Scholarship: This report contains the following data points -- Request #, Primary Contact, Review Group Application Score, High School, College, Major, GPA, Requested Scholarships, Reviewer, Question, Conflict of Interest, Response, Response Score, Weight.
Scholarship (Totals Only Report): This report contains the following data points -- Request #, Primary Contact, Review Group Application Score, High School, College, Major, GPA, Requested Scholarships, Reviewer, Question, Conflict of Interest, Response, Weighted Response Score (= score * weight).
Scholarship with Weighted Score: This report contains the following data points -- Request #, Primary Contact, Review Group Application Score, High School, College, Major, GPA, Requested Scholarships.
When running a report, the report viewer opens in a new browser tab.
You can run this report on multiple review response records by selecting some or all of the review responses in a Reviewer record, then clicking the ellipses, then Run Report.