

Revised 03/19/2026
This guide outlines steps for onboarding new users who need access to akoyaGO CRM, as well as the offboarding process for departing users. Following these steps is essential to ensure users receive the correct licenses, security roles, and system access - and to maintain data integrity and security when access needs to be removed.
Before beginning, confirm that the new user has been added to your Microsoft tenant and that an email address has been created for them.
ONBOARDING
- Assigning Licenses in the Microsoft Admin Center
- Teams & Groups in the Microsoft Admin Center
- Managing Security Roles
- Custom Column Level Security (If Applicable)
- Enabling Outlook Integration
- Adding to SharePoint
- Training
OFFBOARDING
ONBOARDING
Assigning Licenses in the Microsoft Admin Center
New users must be assigned the appropriate licenses before they can access akoyaGO CRM or Business Central. License assignment is completed in the Microsoft Admin Center and must be performed by a user with admin access. A Power Apps license is required for access to akoyaGO CRM, and a Business Central license is required if the user needs access to Business Central.
If you require additional license(s) for your new user, create a case through GOsupport to begin the process.
Accessing the Microsoft 365 Admin Center
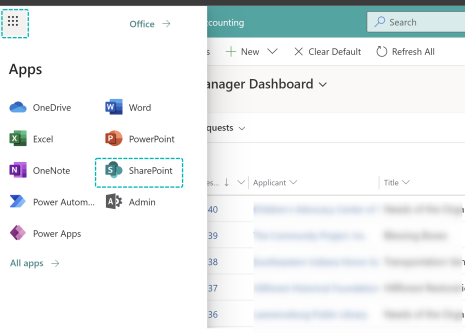
To access the Admin Center, click the App Launcher ("waffle" icon) in the upper left-hand corner and select Admin OR open a new window and type admin.microsoft.com.
Assigning Licenses in the Microsoft Admin Center
Select "Active Users" under the "Users" drop-down in the navigation pane.
Select the User needing setup
Select the "Licenses and Apps" tab
Assign the necessary licenses:
For access to akoyaGO, assign Power Apps per User or Power Apps Premium
For access to Business Central, assign one of the Dynamics 365 Business Central Licenses (Dynamics 365 Business Central Essentials or Dynamics 365 Business Central Team Members). If a user needs to have Business Central permissions, please see the following guide: Adding Permissions in Business Central
You may also assign additional licenses, such as "Microsoft 365 Business Basic" or "Nonprofit Portal." These licenses often need to be assigned, depending on your MS Dynamics 365 setup. Consult your administrator or IT consultant for more information. The circled licenses below (Microsoft Fabric and Microsoft Power Automate) are free for your foundation and can be assigned to any user. These are helpful for using Power BI, Power Automate Flows, and more.
Teams & Groups in the Microsoft Admin Center
While assigning licenses to the new user in the Microsoft 365 Admin Center, you can also consider whether they should be added to any additional teams or groups.
Teams allow users to be grouped to support shared access, collaboration, and security management when multiple users need to work with the same records or processes. For example, you can share a Personal View with a user or a team. Teams can also be used to group users if your organization has custom field‑level security configured. For example, all users in the "Finance Team" have special permissions for certain fields.
If the new user should be able to edit/create GOapply forms and/or custom GOfund grant recommendation forms in GOmanager, or impersonate a GOfund or GOapply user, they should be added to the GOmanager Security Group. More information can be found here: GOapply Permissions - GOmanager Group and GOapply Administrator Security Role
Managing Security Roles
After licenses have been assigned, the next step is to assign Security Roles to the new user. Security Roles are managed in the Power Platform Admin Center and must be assigned by a user with access.
*Access to the Power Platform Admin Center is determined by your Microsoft 365 roles, which are not managed by akoyaGO. If you are attempting to assign Security Roles and/or test and enable email for a new user, but cannot access the Power Platform Admin Center, please reach out to your internal administrator.*
Security Roles control what a user can see and do within the system. They define table-level permissions, ensuring users have the appropriate permissions for their job responsibilities. Assigning the correct roles is essential for proper system access, data security, and a smooth user experience.
When a user is assigned multiple Security Roles, they receive the combined permissions of all assigned roles, with the system granting the highest available access. For example, a Team User who also has the GOapply Administrator Security Role assigned will be granted the additional permissions assigned by the GOapply Administrator Security Role. If you assign any custom roles, ensure the user has access to all permissions included in those roles.
All Users need the following roles assigned:
Dynamics 365 App for Outlook User for email integration
A basic akoyaGO role to grant access to the basic tables of akoyaGO (either Administrator, Team User, or Read Only). For more information, please reference CRM Standard Roles
Any custom Security Roles that have been set up for your organization
Any supplemental roles, such as System Customizer, GOapply Administrator, or Send to Accounting
If the new user needs to launch GOmanager, they need to be added to the GOmanager Group. This is not a Security Role, but is another important permission to consider at this step. This allows the new user to impersonate a GOapply/GOfund User and build/edit GOapply Phases and custom GOfund Grant Recommendation forms. For more information, reference the following guide: GOmanager Permissions
Accessing Users in the Power Platform Admin Center
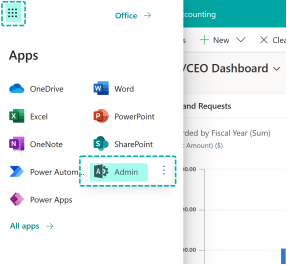
To access the Power Platform Admin Center, click the App Launcher ("waffle" icon) in the upper left-hand corner and select Power Apps. Alternatively, you can navigate directly to admin.powerplatform.microsoft.com.

Click on Power Platform

Click on Power Platform Admin Center
Click Manage and select your production environment


Click "See all" under Users

Assigning Security Roles in the Power Platform Admin Center
Select the user

Click Manage Roles
Choose the Security Roles to assign to the new user.
Remember, your new user should have:
Dynamics 365 App for Outlook User for email integration
A basic akoyaGO role to grant access to the basic tables of akoyaGO (either Administrator, Team User, or Read Only). For more information, please reference CRM Standard Roles
Any custom Security Roles that have been set up for your organization
Any supplemental roles, such as System Customizer, GOapply Administrator, or Send to Accounting
Custom Column Level Security (If Applicable)
If your organization has configured custom column‑level security, consider which permissions the new user should have for any secured fields/columns. If your organization has not implemented any custom column-level security, move on to the next section. If column‑level security is managed through teams, be sure to add the user to the appropriate team(s) in the Microsoft Admin Center, as mentioned above. If column-level security is managed at the individual user level, the user must be added to the relevant column-level security profiles. If you need assistance adding individual users to column-level security profiles, please create a case via GOsupport.
Enabling Outlook Integration
*Access to the Power Platform Admin Center is determined by your Microsoft 365 roles, which are not managed by akoyaGO. If you are attempting to assign Security Roles and/or test and enable email for a new user, but cannot access the Power Platform Admin Center, please reach out to your internal administrator.*
Begin by opening your production environment in the Power Platform Admin Center (see the steps above). Click on Settings.

Click Email

Click Mailboxes

By default, you will likely see the My Active Mailboxes System View. Switch your view to All Mailboxes if needed.
Select the user from the view and Approve Email. Then choose Test & Enable Mailbox.
Click OK
Note: The Test & Enable Mailboxes process can take several minutes, and a page refresh (Ctrl+F5) may be needed to check if the run was successful.
By default, we do not enable syncing appointments and tasks. If your organization would like appointments and tasks to sync please see this MS Learn article on information on setting up server-side synchronization see MS Learn documentation: https://learn.microsoft.com/en-us/power-platform/admin/set-up-server-side-synchronization-of-email-appointments-contacts-and-tasks
Please note if any changes are made after a user's email has been approved, you will need to reapprove, test, and enable for changes to be considered.
Once the Test & Enable Mailboxes process is complete, the top two fields (Incoming Emails and Outgoing Emails) should show “Success.” Depending on your Server, the "Appointments, Contacts, etc." field may or may not be successful. Here is an example of an email address that has been successfully tested and enabled, and an email address that failed:
If you need to Approve and Test & Enable multiple new users, you can select them from the Approve Mailboxes view and Test & Enable them in bulk.
Once the proper Microsoft Licenses have been added to the User’s profile and their mailbox is approved & enabled, the new user is ready to access akoyaGO CRM (and Business Central if a corresponding license is assigned and Business Central permissions have been set.)
Adding to SharePoint
For users to access SharePoint files, site permissions must be granted. This is necessary for the new user to see "Documents" saved to records in akoyaGO.
Accessing SharePoint
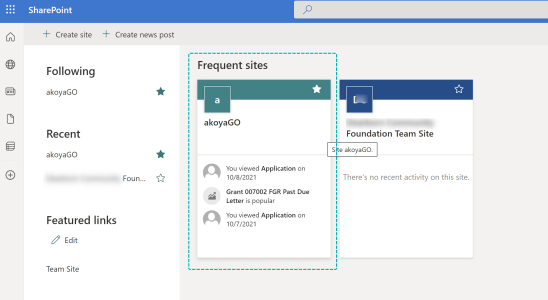
To access the SharePoint, click the App Launcher ("waffle" icon) in the upper left-hand corner and select SharePoint.
Select the akoyaGO site within SharePoint:
Grant Site Permissions
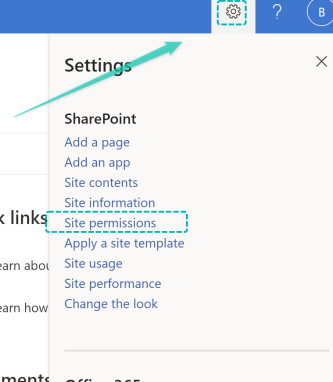
Click on the settings gear in the upper right-hand corner and select the Site permissions
Click on the Share site button. Type the User’s name (as you type, the User’s contact card should appear). Select the User, then click the Add button.

Training
Training is important for familiarizing your new user with the basics of the software, customizations, and role expectations.
Internal training is important so your new staff member understands your specific processes and the responsibilities delegated within your team. As you are training your new user internally, we recommend you:
- Provide your new user access to any existing training materials, such as video recordings of your foundation’s implementation-specific videos.
- Create a list of relevant videos and knowledge articles from GOsupport, specific to the new user's role within the foundation, for training purposes.
- Provide times for New Users to check in and ask questions about their experience.
- Introduce the new user to GOsupport
The akoyaGO team can also offer standard training sessions as billable new work. Scheduling options will be provided to the Administrator upon the Foundation's approval of the estimate. For an overview of standard training sessions currently offered by akoyaGO, please see our Training Menu.
OFFBOARDING
Reassignment
When a user is preparing to leave the organization, it is important to ensure that their active work and owned system assets are properly transferred. Following the steps below helps maintain continuity for teams, prevents delays in operational processes, and ensures no critical records become inaccessible. Many records, workflows, and personal assets in the system are owned by individual users. If these items are not reassigned before the user departs, other team members may lose visibility into or the ability to act on them. Reassigning ownership ensures business processes continue without interruption.
Reassign Active Records
If your organization uses the owner field to delegate work or assign records to a specific staff member, review all active records with the departing user listed as the owner and update to an existing user to reassign work. For inactive records, the departing staff member can remain the owner for historic data. The owner of any active Activities should be reviewed and reassigned as needed.
If the departing user is listed within any other lookup user fields, a remaining staff member should be listed.
This includes fields such as:
- GOapply Settings – Foundation Contact
- GOfund Settings – Foundation User
- GOdonate Settings – Foundation User
- GOapply Opportunity – Internal Phase Contact
- Fund – Foundation Staff Contact
- Custom fields like Program Officer, Grants Manager, Development Staff
Update Hard-Coded References in Templates
If the departing user's information is hard-coded into any Letter Templates, Email Templates, Document Templates, or workflow processes, ensure the hard-coded reference is updated.
Reassign Personal Views and Personal Dashboards
If a departing user has Personal Views or Personal Dashboards that are valuable to the team, they should reassign them so ownership transfers to an active user. Although shared personal views and dashboards remain visible to others while the owner’s account is still enabled, that access is lost once the departing user is disabled. After deactivation, ownership is removed, and any shared personal items will no longer be available to the team.
If the departing user owns any system processes, such as workflow processes, process templates, approvals, or Power Automate flows, these should also be reassigned. Workflows owned by inactive users can fail, pause, or stop running entirely. Reassigning prevents automation interruptions.
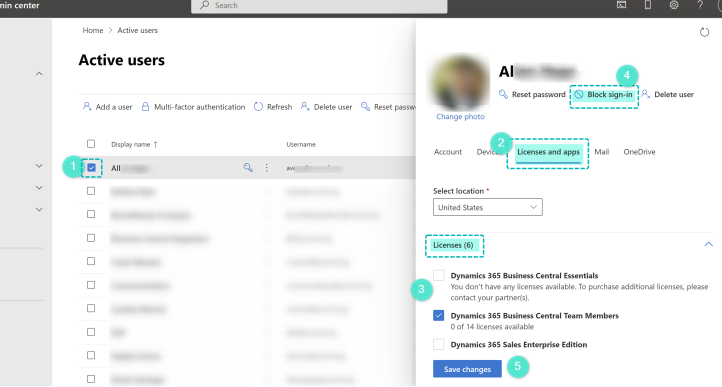
Removing Licenses
Once the User profile pops up:
- Remove all licenses that had been assigned to the user by un-checking the boxes
- Click the “Block sign-in” button
- Click “Save Changes”
Once these steps are complete, we recommend keeping the user’s profile Inactive in your organization’s admin center for historical reference. We do not recommend deleting inactive users from your Microsoft Admin Center or from Business Central. Retaining an inactive user, rather than deleting the account, helps preserve important system history. Records, activities, workflows, and audit trails previously owned by the user remain associated with a valid user record, ensuring data integrity and clear historical context. This approach helps prevent gaps in reporting, avoids orphaned ownership fields, and maintains accurate visibility into past actions and interactions.
Alternatively, you may select the user from the list and choose Delete User. Please note that deleting a user can remove or make more difficult to interpret historical associations, potentially complicating audits, reporting, and long‑term data tracking.