

Revised 04/20/2026
Before a Bank Reconciliation
Bank Reconciliation Process
- Start a New Bank Reconciliation
- Populate Bank Statement Lines
- Match Transactions
- Adjustments
- Remove Lines
- Add Attachments
- Post the Bank Reconciliation
- Troubleshooting
After a Bank Reconciliation
To get the most out of this content, we highly recommend watching the Bank Account Reconciliation Video Series along with this Knowledge Article.
BANK REC PREPARATION - BANK ACCOUNTS
The Bank Account Reconciliation process in Business Central only applies to Bank Accounts. Bank Accounts are G/L Accounts specifically used for payments/deposits.
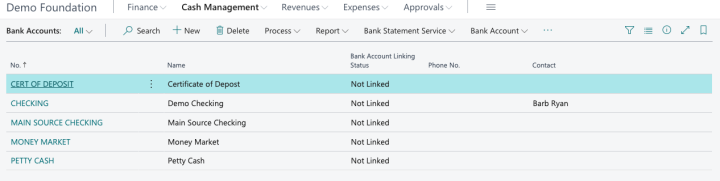
To view Bank Accounts, select Cash Management > Bank Accounts.
If you need to set up a new G/L Account as a Bank Account, please see Setting Up a Bank Account KA for detailed steps.
Please note that if transactions have already been posted to a G/L account that should have been configured as a bank account, setting up the Bank Account alone will not allow you to reconcile this account. If you run into this scenario, please contact Support to determine the next steps.
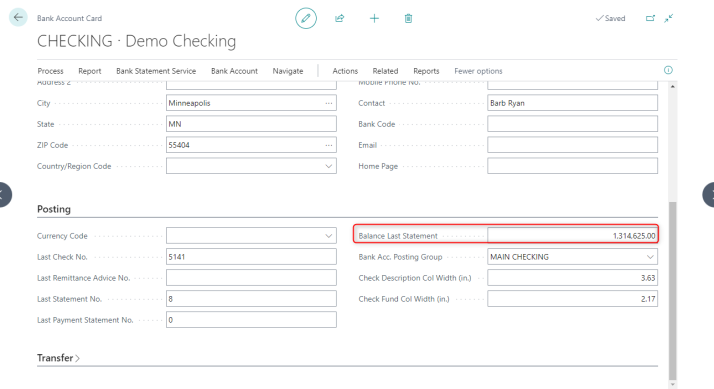
Before the first reconciliation of any bank account, ensure the "Balance Last Statement" (the ending balance of the most recently reconciled period) has been set on the Bank Account Card.
This field is found in the Posting section.
POST AS LUMP SUM - BANK DEPOSITS
The "Post as Lump Sum" setting found on the Bank Deposit form impacts Bank Reconciliation. It is important to understand this setting and consider how it will affect Bank Reconciliation as you are logging deposits.
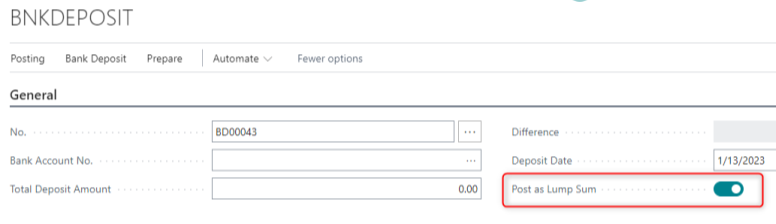
Because of the way the Bank Reconciliation form matches transactions, akoyaGO strongly recommends selecting the “Post as Lump Sum” option when filling out a Deposit form to ensure the list of transactions in Business Central more closely matches your bank statement. Please note that if you decide not to post as a lump sum, you may need to make more matches manually.
For more information on Bank Deposits, please see Bank Deposits KA.
START A NEW RECONCILIATION
To start a new reconciliation (or to open an in-progress bank account reconciliation), search for “Bank Account Reconciliations” or click Cash Management > Bank Account Reconciliations:
*Please note that prior to 2023, this entity was named “Bank Reconciliations.”
Select “+New” to begin a new Bank Reconciliation:
Or click on the Bank Account No to select an existing Bank Account Reconciliation:
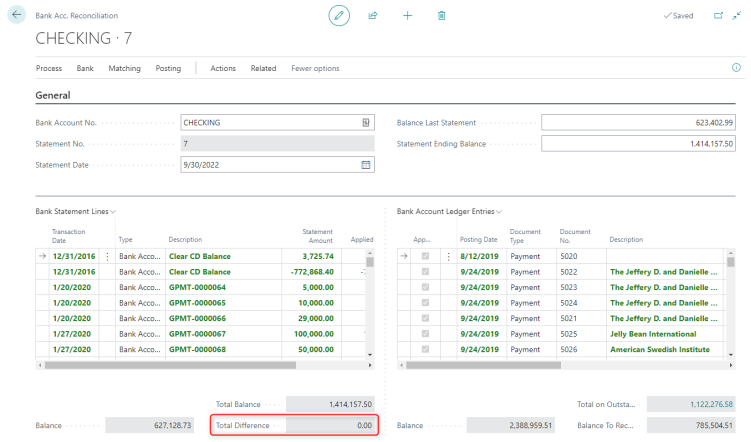
On the Bank Reconciliation form, set the following
- Bank Account No. - The Bank Account to be reconciled.
- Statement Date – The ending date of the bank statement. Bank Account Ledger Entries are automatically listed through the defined Statement Date.
- Statement Ending Balance – The ending balance according to the bank statement.
- Balance Last Statement will populate automatically from your last completed bank reconciliation for this account.
Bank Statement Lines (left) represent the data on your bank statement.
Bank Account Ledger Entries (right) are transactions posted in Business Central.
POPULATE BANK STATEMENT LINES
The Bank Statement Lines section of the form should reflect the transactions as they appear on your bank statement.
Bank Statement Lines can be populated:
- Manually (by typing them in)
- By importing a .CSV file provided by your bank. If your bank provides your bank statement as a CSV file or Excel spreadsheet, this is the suggested way to populate Bank Statement lines.
- Automatically by using the Suggest Lines action. This action copies entries from the Bank Account Ledger Entries section and can be helpful when bank statement lines are entered manually. However, this option is generally not recommended, as it simply copies existing transactions from Business Central. If you are using the Suggest Lines action, make sure you are comparing to your bank statement.
MANUALLY ENTER BANK STATEMENT LINES
To manually enter Bank Statement lines, type the transaction information into the Bank Statement lines table:
IMPORT BANK STATEMENT LINES
A bank statement import format must also be set for the bank account. This defines how Business Central interprets the CSV file, including the columns for Amount, Description, and Posting Date. The setup and import process is included in the Bank Reconciliation Video Series (specifically covered in the videos titled Preparing a CSV File for Import, Setting Up an Import Format for a Bank Account, and Importing Your Bank Statement).
*The first two sections below cover preparing a CSV file and Import Format for a Bank Account. If these steps have already been completed for you and you are ready to import, please skip directly to Import Bank Statement Lines
If your bank has provided you with an Excel file or CSV file of a bank statement, you may need to manipulate it before importing.
Business Central requires a CSV file containing the following columns:
- Posting Date
- Amount (in a single column containing deposits/credits as positive numbers and withdrawals/debits as negative numbers)
- Description
After preparing your CSV file for import, you may need to create a bank statement import format for the Bank Account if one does not already exist, or if this is the first time importing a CSV file for that account.
Please note that if you have multiple Bank Accounts that receive bank statements in the same format, the Bank Accounts in Business Central can all reference the same Bank Statement Import Format.
To set up a new Import Format, begin by opening your Bank Account from Cash Management > Bank Accounts:
Select the Bank Account:
On the Bank Account card, find the Bank Statement Import Format field (in the Transfer section:)
If the Bank Statement Import Format already exists, select it from the dropdown. Or, click +New to create a new Bank Statement Import Format:
Assign your Import Format a Code and a Name, such as the bank's name. The code cannot include spaces. Set the direction to Import:
Select the row, click the three dots at the top of the page, and select Actions > Bank Statement File Format Wizard:
Click Next:
Click Upload a bank statement file and select the CSV file version of your bank statement that has been formatted for Business Central:
After your CSV file has successfully uploaded, click Next:
Depending on how your CSV file is formatted, define how many Header Lines to Skip and click Next:
Enter additional details regarding your CSV file, such as the Column Separator (set to Comma for CSV files) and the Column Count. The Bank Statement File Format Wizard will figure out how many columns the CSV file includes, but be sure to review this to make sure the Column Count is correct. Click Next:
Identify the columns that include the Date, Amount, and Description. Again, the Bank Statement File Format Wizard will try to determine this for you - but be sure to check that it has set the correct columns.
These are the columns that will be imported into the Bank Statement Lines, so it is important that these are set accurately!
Click Next:
Set the Date Format to match the format in your CSV file. For example, if my CSV file contains dates in the format 1/1/26, I would set the Date Format to m/d/yy. If it were formatted as 01/01/2026, I would set Date Format to MM/dd/yyyy, etc.
Set the Decimal Separator to a comma or a dot, based on how your amounts are formatted. For example, amounts in my CSV file are formatted as 123.45, so I have selected "Dot."
Click Next:
Click Next
To set the new Import Format on your Bank Account, select the Bank Account and click Finish:
Once the Import Format has been set up for a Bank Account, you are ready to populate the Bank Statement Lines by importing the bank statement CSV file.
- Open the Bank Account Reconciliation.
- Select Bank > Import Bank Statement:
- Drag the CSV file or click to browse. Upload the CSV file:
If the import is successful, you will see the Bank Statement Lines table from your CSV file:
SUGGEST LINES
To copy entries from the Bank Account Ledger Entries section to the Bank Statement Lines section, you can use the Suggest Lines action. Again, this can be helpful if bank statement lines are being entered manually, but it is not our recommendation if importing lines is an option.
To suggest lines, choose Home > Suggest Lines
In the Starting Date field, enter the earliest posting date for the ledger entries to be reconciled.
In the Ending Date field, enter the latest posting date for the ledger entries to be reconciled. (Typically, the ending date will match the date specified in the Statement Date field. However, if you want to reconcile transactions for only part of a period, you can enter a different ending date.)

MATCH TRANSACTIONS
Once you have populated the Bank Statement Lines table, you are ready to begin matching.
The Match Automatically action makes matches based on transaction descriptions, posting dates, and amounts.
Click Matching > Match Automatically:
You will be prompted to input a Transaction Date Tolerance. This prompt determines the time frame the system should search for matches. We recommend using a large number, like 365, for the broadest search of transactions.
Click OK:
You will receive a notification of the number of matches the system made. Click OK to close the notification:
You can overwrite the suggested automatic matching, or choose not to use automatic matching at all and make all matches manually.
(You can use a mix of manual and automatic matching. If you have manually matched entries, automatic matching will not overwrite your selections.)
All bank statement lines and bank account ledger entries that were matched change to bold green font.
For any unmatched transactions, use the Manually Match steps shown in the next section of this Knowledge Article.
The Applied Amount in the Bank Statement Lines table shows the amount matched, along with the Bank Account Ledger Entries that make up this amount. We recommend double-checking matched transactions. To see more information about the matched Bank Account Ledger Entries, such as the document number, Description, fund, etc, click on the Applied Amount.

If a transaction is incorrectly matched, the match can be removed.
- Select the Bank Statement Line to be unmatched
- From the Matching menu, choose Remove Match
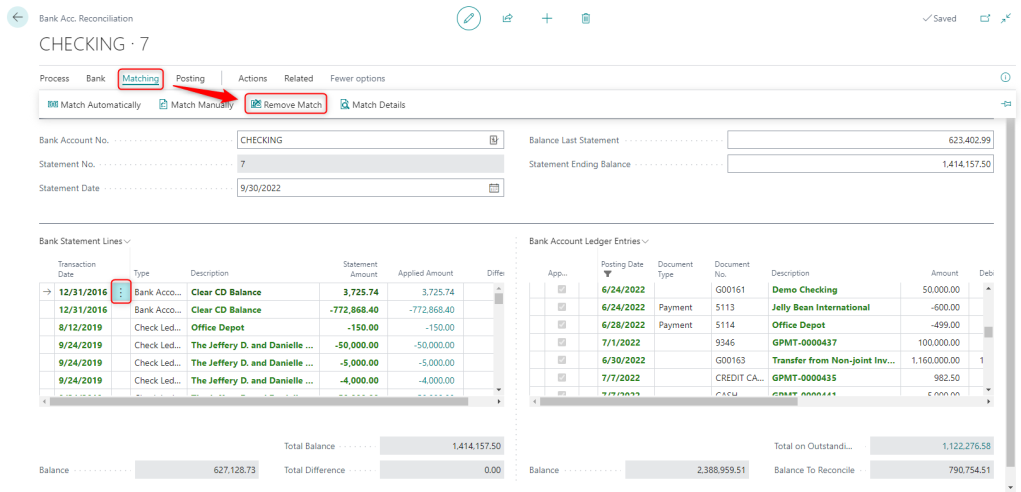
If you have matched multiple bank statement lines to a ledger entry, and need to remove one or more of the matched lines, all manual matches are removed for the ledger entry when you choose “Remove Match.”
Match Transactions Manually
When matching lines and entries manually, the “Show All,” “Show Reversed Entries,” “Hide Reversed Entries,” and “Show Nonmatched” actions can help provide an overview. By default, the bank account ledger entries don't include unmatched reversed entries. To include these entries in the list and match them manually, choose the “Show Reversed Entries” action. If you choose to hide reversed entries after you've made one or more matches, the matched entries are still shown.
- Select a non-applied line in the Bank Statement Lines pane.
- In the Bank Account Ledger Entries pane, select one or more ledger entries that can be matched with the selected bank statement line.
To select multiple lines, press and hold the CTRL key, then select the lines, or click the three dots and choose "Select More." You can match multiple Bank Statement Lines to one Bank Account Ledger entry, or multiple Bank Account Ledger entries to one Bank Statement Line. For example, multiple Bank Statement Lines might be matched to a single Bank Account Ledger Entry if your bank deposit included several payment methods, such as credit cards from different issuers, and your bank lists them as separate lines.
- Choose the Match Manually action.

4. Once matched, the selected bank statement line and the selected bank account ledger entries change to green font. The Applied check box will be selected. An Applied Amount will appear on the Bank Statement Line.
5. Repeat steps 1 through 3 for all unmatched Bank Statement Lines
ADJUSTMENTS
If entries need to be added to the Bank Account Ledger Entries (such as interest or bank service charges, transfers, etc.), these transactions should be entered via a Journal Entry. After posting, entries that fall within the correct dates will automatically be added to the reconciliation.
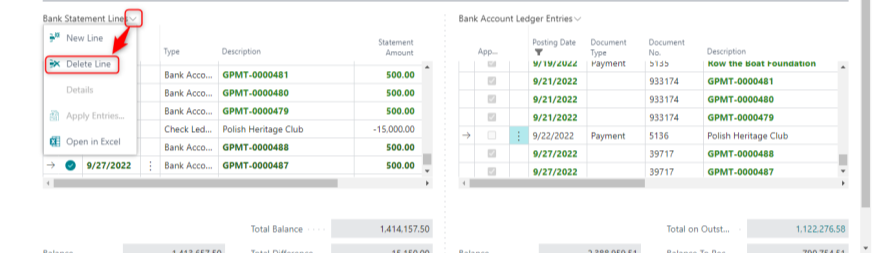
REMOVE LINES
Depending on the selected method to populate the Bank Statement Lines, transactions that do not appear on the bank statement may need to be removed.
To remove a single line, select the three vertical dots for that transaction and choose Delete Line.
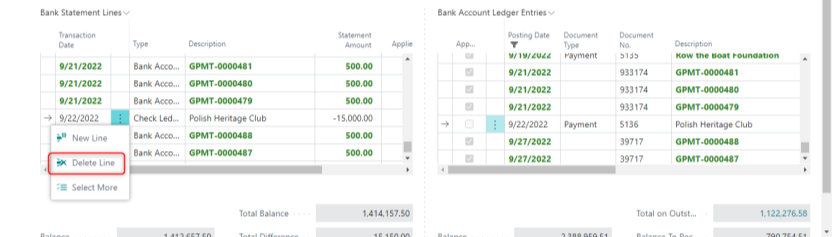
To remove multiple lines at once, choose Select More, select the rows to be deleted, then from the Bank Statement Lines menu choose Delete Line.
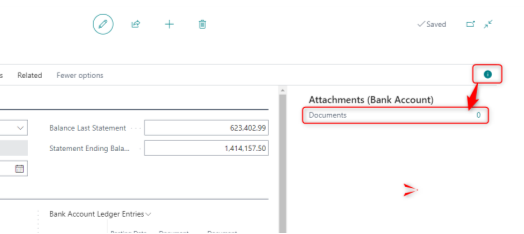
ADD ATTACHMENTS
Attachments are linked to a Bank Account Reconciliation within the FactBox pane. If the FactBox pane is collapsed, click on the “i” icon to expand it. Select the number (the pictured example shows “0”) to view existing documents or upload new documents.
Click on + New to upload a document from your local files. Clicking on an attachment will automatically download it.
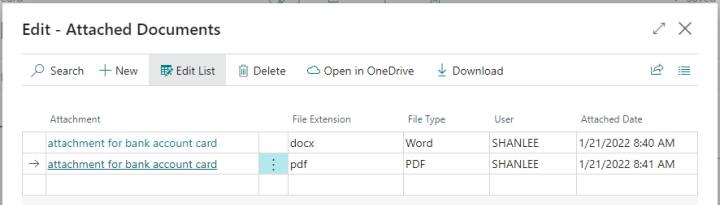
Attachments will follow a bank reconciliation once it is posted.
POST THE RECONCILIATION
Before posting the Bank Account Reconciliation, confirm the value in the “Total Difference” field is zero. This field specifies the total amount of the Difference field across all lines on the Bank Reconciliation. Therefore, if all Bank Statement lines have been matched, the value will be zero.
To post the Bank Account Reconciliation, select Home > Post > Post or Post and Print
TROUBLESHOOTING
If there is a remaining difference when you are ready to post your Bank Account Reconciliation, verify the following:
- The Balance Last Statement shows the correct ending balance from the previous bank statement.
- No entries were accidentally made directly to the G/L account for this Bank Account
VIEW A POSTED BANK RECONCILIATION
To view a posted reconciliation, click Cash Management > Posted Bank Reconciliations:
Click the Bank Account No. to open the Reconciliation:
UNDO A BANK ACCOUNT RECONCILIATION
If there was a mistake in a posted Bank Account Reconciliation, you can Undo it from the posted Bank Account Reconciliation to correct the mistake and repost.
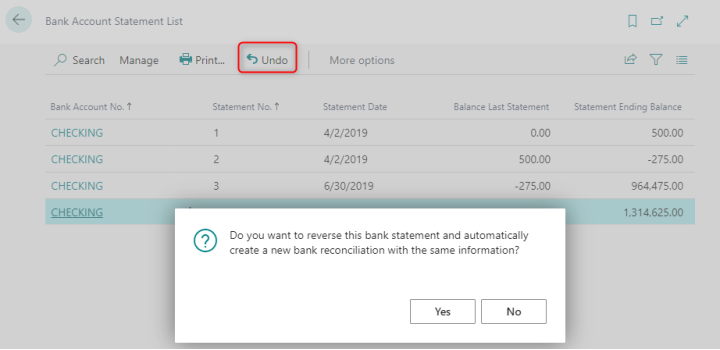
When you undo a posted bank reconciliation, the entries are moved back to the Bank Acc. Reconciliation page. Matching will not be removed. You can then correct the bank reconciliation and post it again.
The bank statement number and the balance from the last statement for the new bank reconciliation come from the Bank Account card. When you undo a Bank Account Reconciliation. The Statement No. will advance. If you want to use the same number as the canceled bank reconciliation, you can use the Change Statement No. action on the Bank Acct. Reconciliation page.
To do this:
- Select Actions and then Change Statement No…
- In the New Statement No. field, enter the number you want to use, and then select OK.
Please note: if bank reconciliations have been posted after the reconciliation you are reversing, all subsequent bank reconciliations must also be reversed—including the one you are updating. Once reversed, they must be reposted in chronological order to prevent issues with the Last Statement No. on the bank account card in Business Central. For example, if you need to undo the June bank reconciliation but July and August have already been posted, all three must be undone and then reposted in order.