

Revised 08/21/2026
This guide walks you through voiding, adjusting, and refunding payments in akoyaGO CRM for clients who use akoyaGO with accounting and Business Central.
For processing voids, adjustments, and/or refunds in akoyaGO for clients who do not use Business Central, please see Request Payment Voids, Adjustments and Refunds for Non-Accounting App
Void a Request Payment
Payment Status = Received
When the Payment Status = Received, it means the payment has been sent to accounting (Business Central).
To void a request payment, drop down the Reverse/Adjust command bar button. Choose Void.
A quick-create panel will open on the right side of the screen. Select the date on which this void should be posted.
Save and Close.
After voiding, the payment will have a payment status of Reversed.
Two entries will be made in the G/L to account for this: a credit to the expense account and a debit to the payable account. The entries will be posted according to the date you specified.
Payment Status = Paid
When Payment Status = Paid, it means the payment has been sent to accounting (Business Central) and a check has been printed.
You cannot void a paid payment directly in akoyaGO CRM. You must void the check from the check ledger in Business Central. If you attempt to void a request payment with a payment status of Paid, you will see the following popup
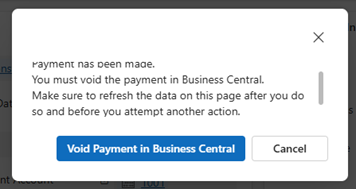
Clicking Void Payment in Business Central opens a new tab and takes you directly to the check ledger entry corresponding to that payment. Once there, select Void Check.

A confirmation box will prompt you to confirm the voiding of the check. Confirm the Void Date and Type of Void.
The Void Date is used only for the check/disbursement portion of the transaction. The expense/accrual portion can have a different void date in the steps that follow, if appropriate.
The Type of Void defaults to "Unapply and void check". This reopens the expense, allowing you to reissue the payment or void the original expense later. This is the recommended option. "Void check only" does not reopen the original expense/payable and leaves the payment void as the open entry on the vendor ledger. Use this only in special circumstances.
After voiding the check in the check ledger, the payment status will show as Received. To void the request payment, drop down the Reverse/Adjust command bar button. Choose Void. The payment status will now show as Reversed.
If no "Void Payment in Business Central" button is displayed, the payment is not found in the check ledger. This occurs for payments posted without a "Bank Payment Type", such as electronic payments that were processed outside of Business Central. In this case, locate the payment in Business Central by selecting Expenses> Vendor Ledger Entries. Filter for the Document No. shown as the Check No. on the payment record.
To void the payment:
- Select the three vertical dots on the payment line, then choose "Unapply Entries"
- Select the three dots again, then choose "Reverse Transaction"
Payment Status = History
When the Payment Status = History, it likely means that this payment was imported as part of your akoyaGO data migration during your organization’s implementation phase.
- To void a historical payment, drop down the Reverse/Adjust command bar button. Choose Void.
- Set a Void Date. This is the date on which the void will be posted. Void Date will default to the original posting date.
- The expense account will be reflected here, but the field will be locked. If the expense account was not originally populated, you must choose one, as this field is required.
- The payment account will also be reflected. You can update this account if needed. If the payment account was not originally populated, you must choose one, as this is a required field.
- Save and Close.
- The Payment Status will update to Reversed.
- Two reversing entries will be made in the general ledger in Business Central – a credit to the expense account and a debit to the payment account.
Adjust a Request Payment
Payment Status = Received
- To adjust a received request payment, drop down the Reverse/Adjust command bar button. Choose Adjust.
- A quick-create panel will open on the right side of the screen. Specify the date the adjustment should be posted. Adjust the amount, expense account, fund, function, or payee. These values will default to their original values.
- While making an adjustment, you can also update the GL Memo if needed. This field defaults to the current value and can be left unchanged if no update is required. Updating the GL Memo by itself does not require an adjustment and can be done directly on the form at any time. However, if you are already creating an adjustment, you may choose to update the GL Memo as part of that process.
- When you are happy with the adjustments, click Save and Close.
A new payment will be created with the adjustments you’ve just made. You will see a banner on the page with a button that takes you to the new payment page. The owner of the new payment record will be the user who initiated the adjustment action.

The new payment will be automatically sent to accounting and will appear as Received. The original payment will have a payment status of Reversed.
Four adjusting G/L entries will be made and posted on the date specified – two debits, one to the payable account and one to the expense account, and two credits, one to the payable and one to the expense.
Payment Status = Paid
- To adjust a request payment, drop down the Reverse/Adjust command bar button. Choose Adjust.
- Set an adjustment date. This is the date to which adjusting entries will be posted. The adjustment date will default to the original posting date.
- Adjust the expense account, fund, or function. Click Save and Close.
- A new payment will be created with the adjustments you’ve just made. You will see a banner on the page with a button that takes you to the new payment page. The owner of the new payment record will be the user who initiated the adjustment action.
- The new payment will be automatically sent to accounting and will be marked as Paid. The original payment will have a payment status of Reversed.
- The adjusting entries will be posted to the general ledger on the date that you specified.
- A credit entry will be made to the original expense account, and a debit entry will be made to the new (adjusted) expense account, if applicable.
- Adjusting entries will be made to the new (adjusted) fund, if applicable.
- Adjusting entries will be made to the new (adjusted) function, if applicable.
Payment Status = History
- To adjust a historical payment, drop down the Reverse/Adjust command bar button. Choose Adjust.
- Set an adjustment date. This is the date by which adjusting entries will be posted. Adjustment Date will default to the original posting date.
- Adjust the Fund, Account, or Function.
- Save and Close.
- A new payment will be created and automatically sent to accounting with a payment status of History. The original payment’s payment status will be Reversed. The owner of the new payment record will be the user who initiated the adjustment action.
- Two adjusting entries will be posted to the general ledger in Business Central – a debit and a credit to the expense account.
- Please note that these entries will not hit the vendor ledger, ensuring the adjustments are recorded accurately.
Adjusting an already adjusted historical payment
If you need to adjust a historical payment you have already adjusted, make your adjustments on the newly created payment. To ensure this, set the payment status to History.
Refund a Request Payment
Payment Status = Received
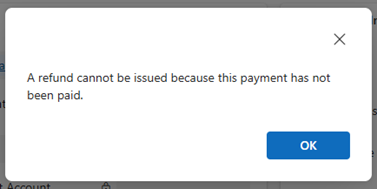
In this scenario, refunds are not allowed. A payment must be Paid or History in order to process a refund. If you attempt to refund a payment when its payment status is Received, you will see the following pop-up.
Payment Status = Paid
- To refund a request payment, drop down the Reverse/Adjust command bar button. Choose Refund.
- Set a refund date. This is the date to which adjusting entries will be posted. The refund date will default to today's date.
- Set a refund amount and update the expense account if needed.
- Save and Close.
- A new payment will be created to account for the refund. You will see a banner on the page with a button that takes you to the new payment page. The owner of the new payment record will be the user who initiated the refund action.

- The new payment will be automatically sent to accounting, with a payment status of Received and a negative amount.
- The original payment’s payment status will remain Paid. The original payment will show a Refunded Amount equal to the amount you entered.
- The updated expense account will be credited for the refunded amount. The refunded amount will also pass through the payable account and land in your undeposited funds account (typically 1999).
Deposit the new payment
Now, deposit the refunded amount in the undeposited funds account. Follow your normal deposit steps. See the Bank Deposits knowledge article for help with depositing.
Void a Refunded Payment
In the case that you need to void an already refunded request payment, you can do that from the new payment that was created out of the refund process.
To know you are in the correct payment record, ensure that the Refunded Amount is null (does not contain data).
From that payment record, drop down the Reverse/Adjust command bar button and choose Void, and walk through the void process.
Payment Status = History
- To refund a historical payment, drop down the Reverse/Adjust command bar button. Choose Refund.
- Choose a refund date. This is the date on which the refund will be posted. The refund date will default to the original posting date.
- Set the refund amount and update the expense account if needed. These values will default to their original values.
- Save and Close.
- A new payment will be created and automatically sent to accounting with a status of Received. You will see a banner on the page with a button that takes you to the new payment page. The owner of the new payment record will be the user who initiated the refund action.

The new payment will have a negative amount.
The original payment record’s payment status will remain History, and the Refunded Amount will populate.
In the general ledger, two adjusting entries will be made – a credit to the expense account and a debit to the undeposited funds account (likely 1999).
Deposit the new payment
Now, deposit the refunded amount in the undeposited funds account. Follow your normal deposit steps. See the Bank Deposits knowledge article for help with depositing.
Calculated Fund Fields
Request payment refunds will be accounted for in the following calculated fund fields:
- Current Year Grants
- Last Year's Grants
- Current Fiscal Year Grants
Request payment refunds will NOT be accounted for in the following calculated fund fields:
- Request Payments This Calendar Year
- Request Payments Last Calendar Year
- Request Payments This Fiscal Year
- Request Payments Last Fiscal Year
Amend Grant Amount (Request)
After you have reversed any payments, add a Grant Amendment amount on the Request. The Grant Amendment field should be utilized if funds are returned by entering a negative amount, or if you are providing additional funds by entering a positive amount. Do not adjust the Original Grant Amount. Note that the Grant Amount is calculated by taking the Original Grant + Grant Amendment. This way, you can track the full picture - the amount that was originally approved is in the Original Grant field, the amount that was adjusted is in the Grant Amendment field, and the Grant Amount is the amount the applicant received in the end (and will reflect the Grant Amendment)
In the example below, the applicant was originally awarded $1,500. After the first $500 payment, the remaining $1,000 was refunded.